What is Sheet2Site
Sheet2Site is a tool that will help you create a beautiful website from Google Sheets with pictures, text, filters and links. Make a website without writing code from just one Google Sheet.
What sites you can make?
You can make grid style sites, for example a list of cities, events, tools, equipment, etc.
Should I create a new webiste or Embed to existing?
- If you already have an existing website you can embed Sheet2Site page to your website with a code snippet. It will keep your logo, navigation bar footer. It will be on a separete page like: yourwebsite.com/directory
- Or you can create a entire website from scratch using templates. Each site will have navigation bar, header, filters, cards and details pages.
Why should I use Sheet2Site?
Because if you have an idea and you know basics of Google Sheets you can easily and quickly create a website and make your idea live without procrastination and pain
Getting Started
1. Install Sheet2Site Google Sheet Add-on:
Install
2. Share the sheet

3. Quick Start
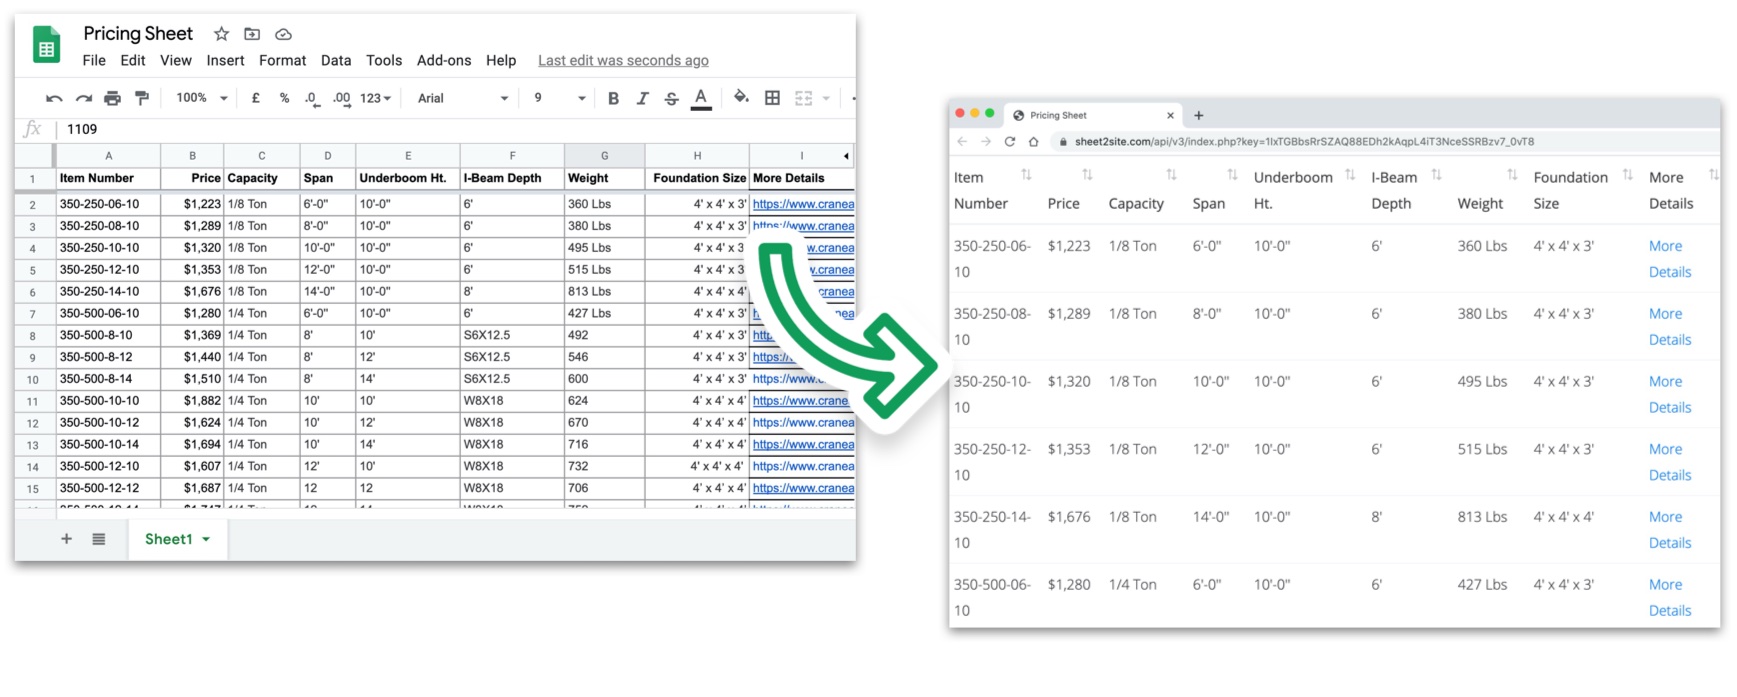
If you already have data in your Google Sheet you can already convert it to the table on the website.
Click on Update Website in the menu and you will get your website link.
You should get a link
https://www.sheet2site.com/api/v3/index.php?key=1IxTGBbsRrSZAQ88EDh2kAqpL4iT3NceSSRBzv7_0vT8
Table options
Also take a look on Table options. You can hide some columns, add buttons and images or change the colors.
Embed this table
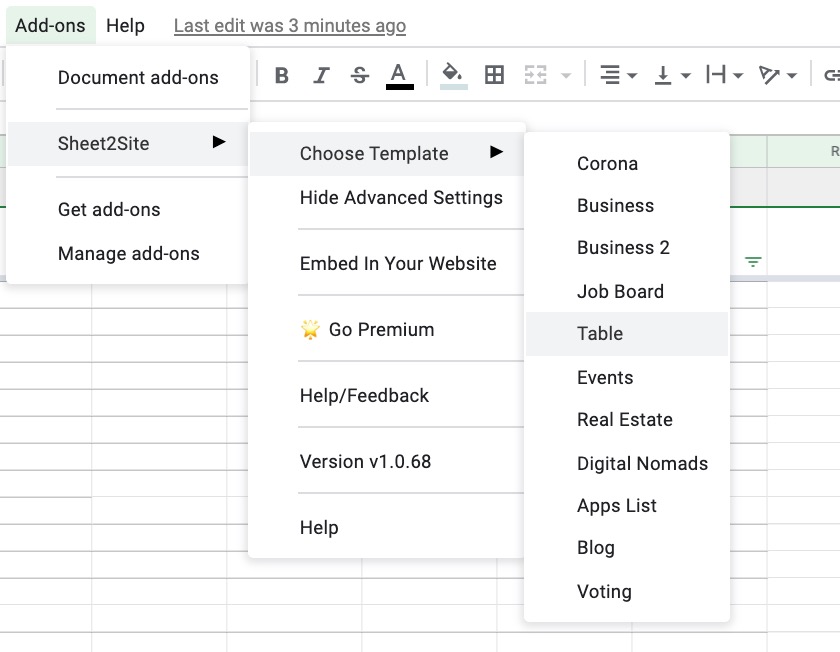
You can Embed this table to your website.4. Choose a template
If you want to have some other tempalte and more customization you can select a template: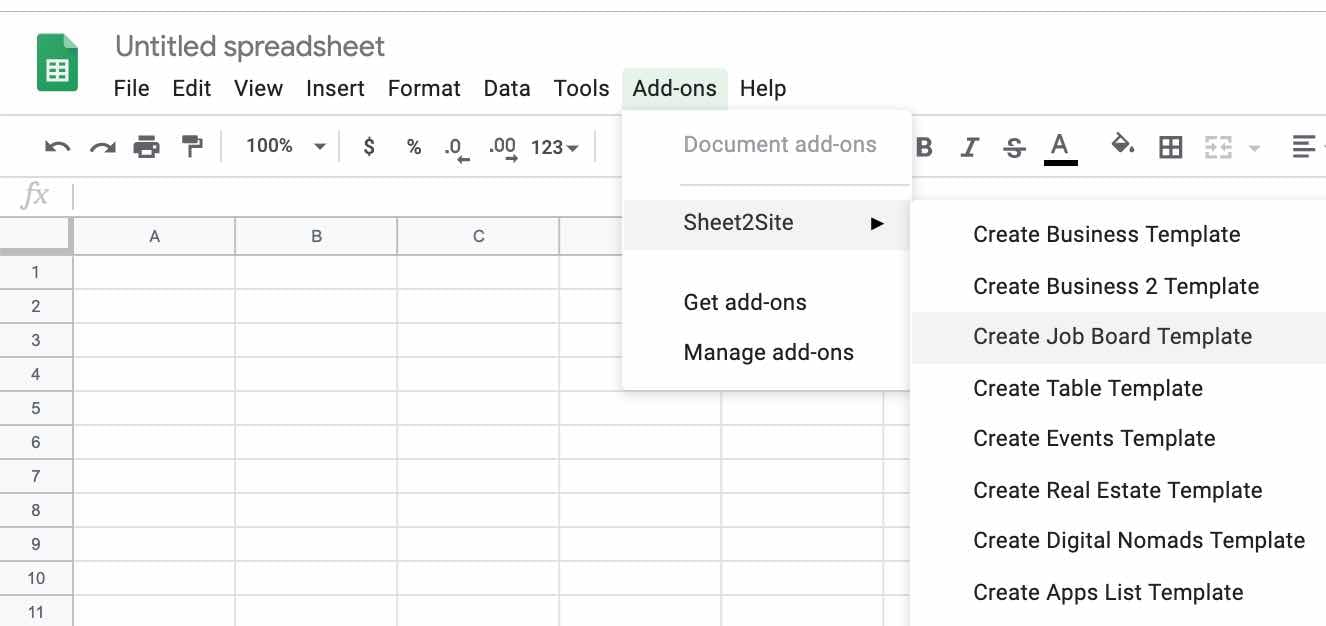
5. Edit your website
Try to change the text in a "Header" tab to understand how it works: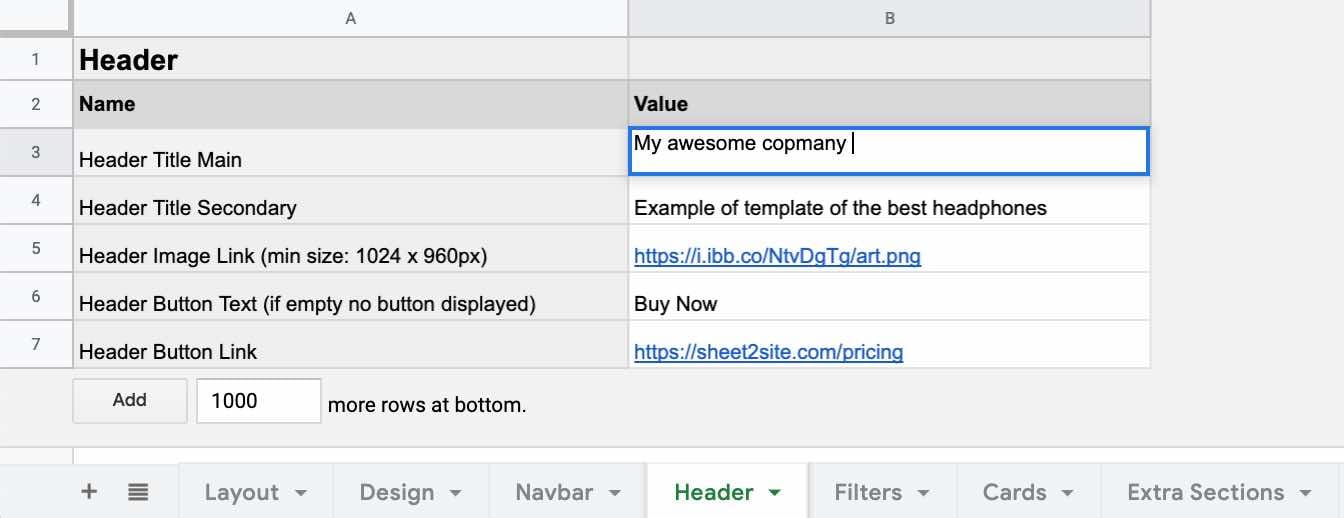
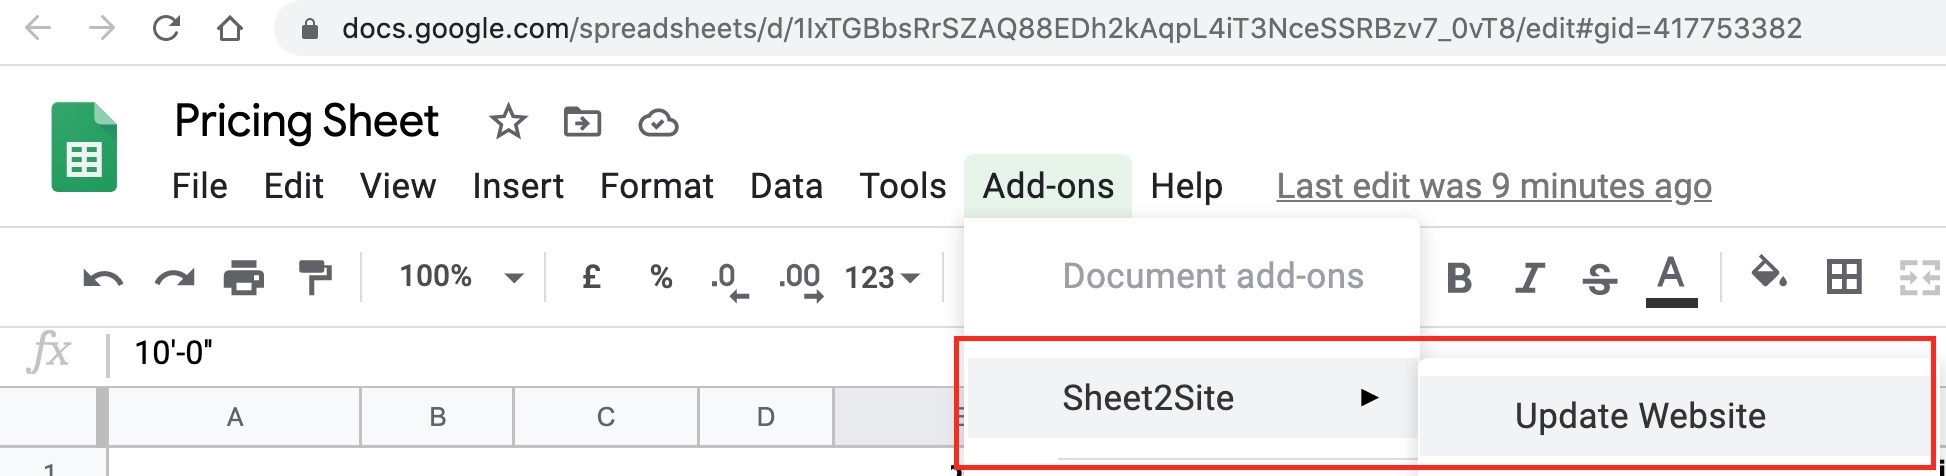
6. Push changes
Push changes to your website from a Google Sheet press "Update Website" or open the link if you saved it previusly, wait 15 secs and reload the page again.
Basics
Each Sheet2Site website consists of 1 Google Sheet. The website is updating automatically if there are any changes made in the sheet. The website is consist of parts like "Header", "Cards", "Description" and other. Each of this part is represented in a tab in the bottom of this Google Sheet. In tabs you can customize or hide some specific part of your webiste.
Tabs:
-
Layout- The live preview of your website where you can see how it will looks like. Here you can choose template for each of parts of your website or hide them. -
Design- Colors and fonts of your website -
Navbar- Navigation bar that located in the top of your website that allows you to connect multiple subpages and add the logo -
Header- Header's main and secondary titles, hero image, call to actions -
Filters- Filter settings for cards -
Cards- The database of items of your website. It could be goods, items, job vacancies, events etc. -
Extra Sections- Top and bottom extra section with text and image -
Map- You can create an embedded map with locations -
Footer- Footer settings of your webiste with links such as "Made by" or any other. -
Settings- Here you can add integrations with Google Analitics, chat. Add SEO data, favicon icon and other. -
Detaile Pages- List of detail pages of your website where you can add more infor about some specific item and it will be avalible on a link like: yourwebsite.com/detailpage -
Advanced- Here you can add custom HML and Javascript for your website. For example you can add sharing buttongs.
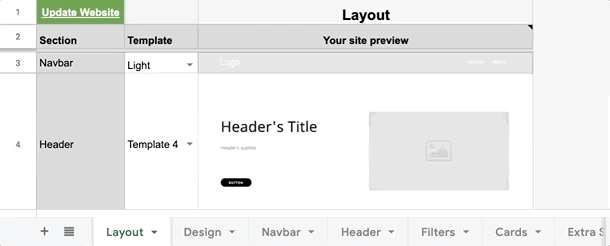
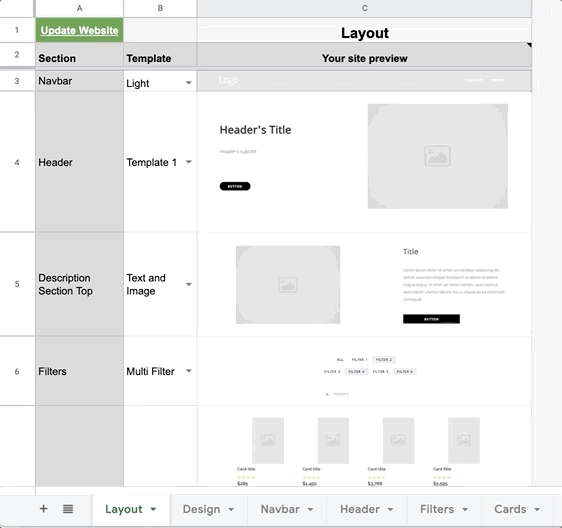
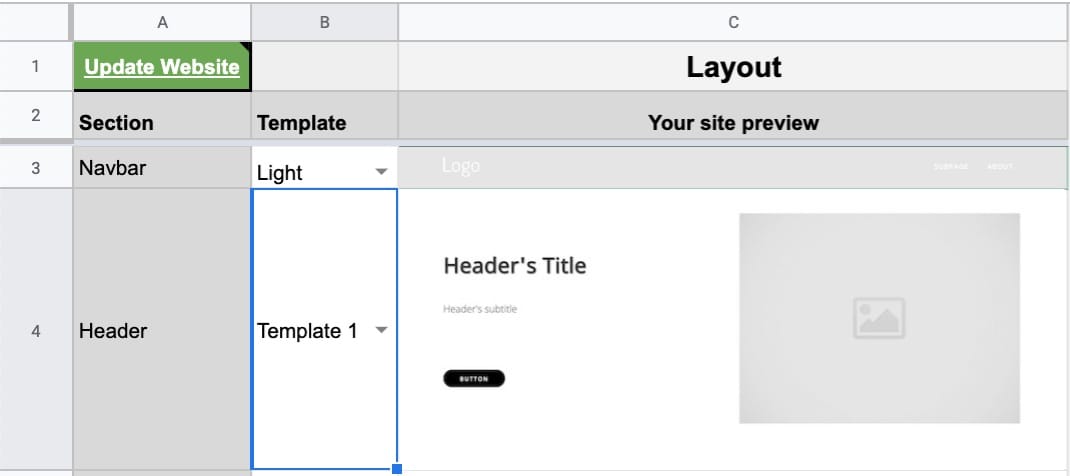
Layout
In the Layout tab you can select a template of each parts of your website live preview of your website where you can see how it will looks like. Here you can choose template for each of parts of your website or hide them.
To open a link of your website you can click "Update Website" green button
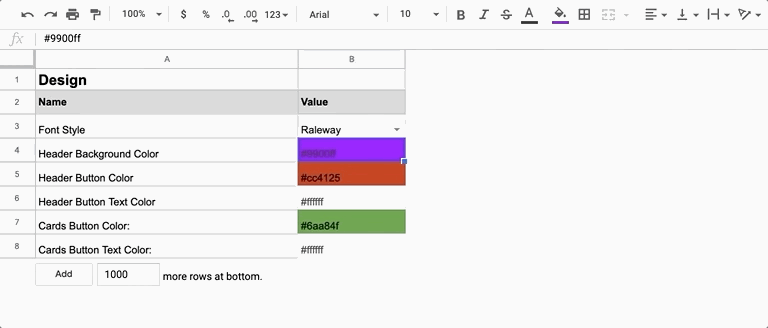
Design
Colors and fonts of your website. To change colors of your website, just as easy to change background color in Google Sheet:
- Font Style
- Header's background color
- Header's button color
- Header's button text color
- Card's button color
- Card's button text color
Navbar

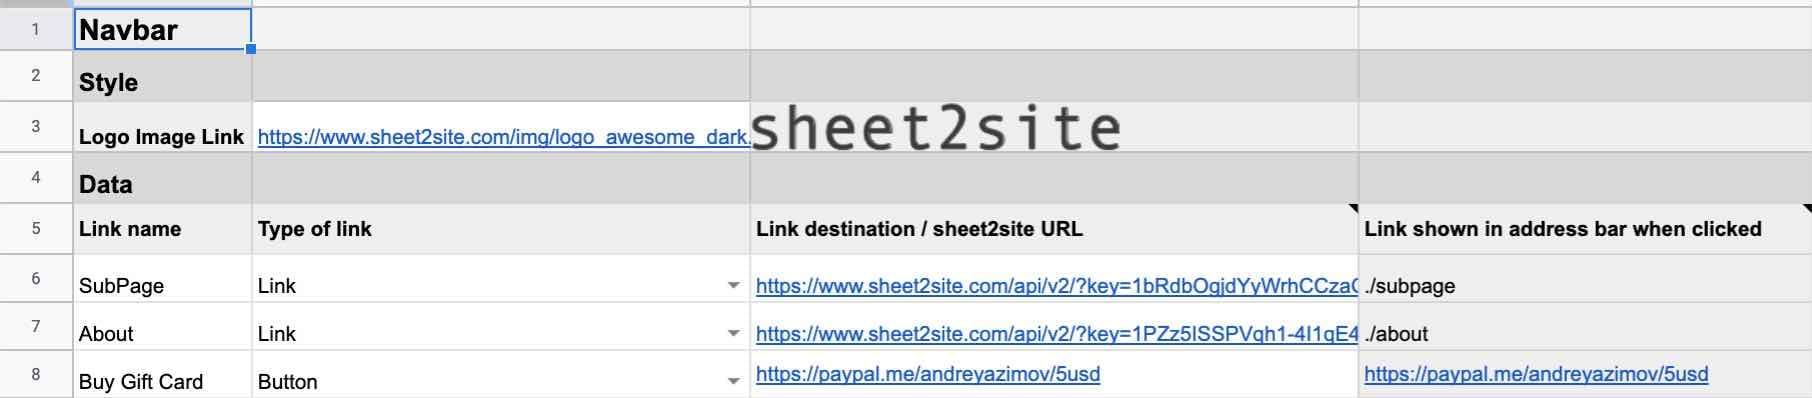
- Link name: How user will see it in the navbar
- Type of link: Link or button
- Link destination / Sheet2Site URL: Sheet2Site link will link to a sheet2site subpage. This will be shown as yourwebsite.com/subpage. Also works with Google Forms and Typeform. External links will take visitors to another site
- Link shown in address bar when clicked: This is a preview of how your sheet2site URL will look e.g. yourwebsite.com/subpage.
Header
Header template
To change header template please go to the Layout tab and select the header template
Header titles
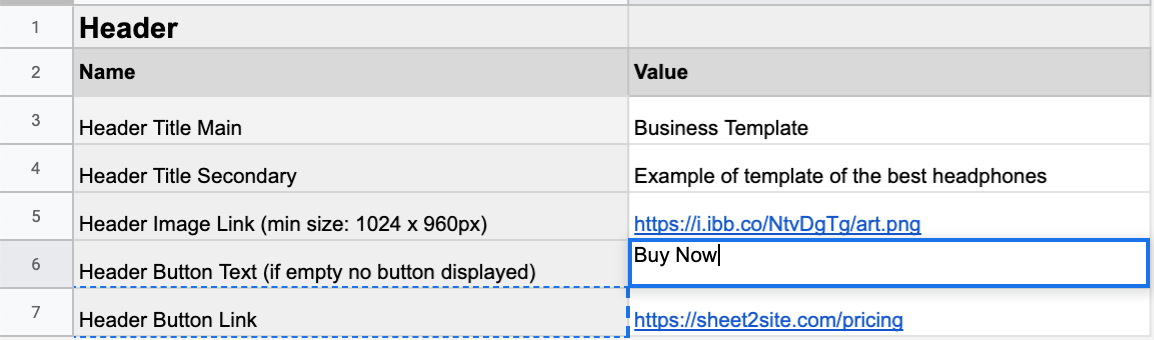
Call to action
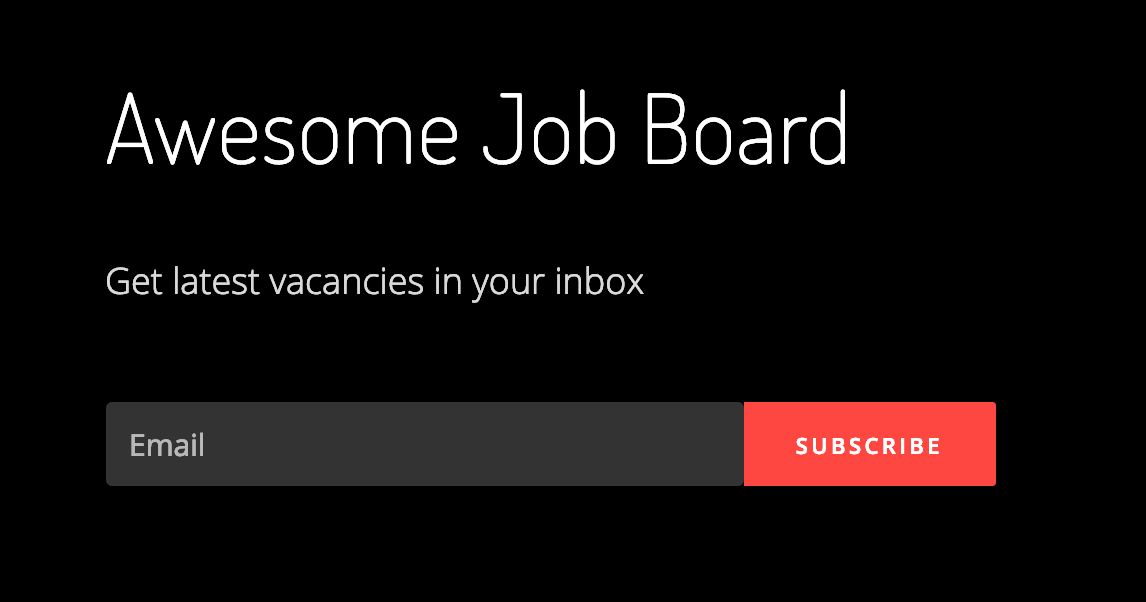
You can add call to action buttons in the header. You can add a button with:
- A link to external site
- Mailchimp email subscribe form
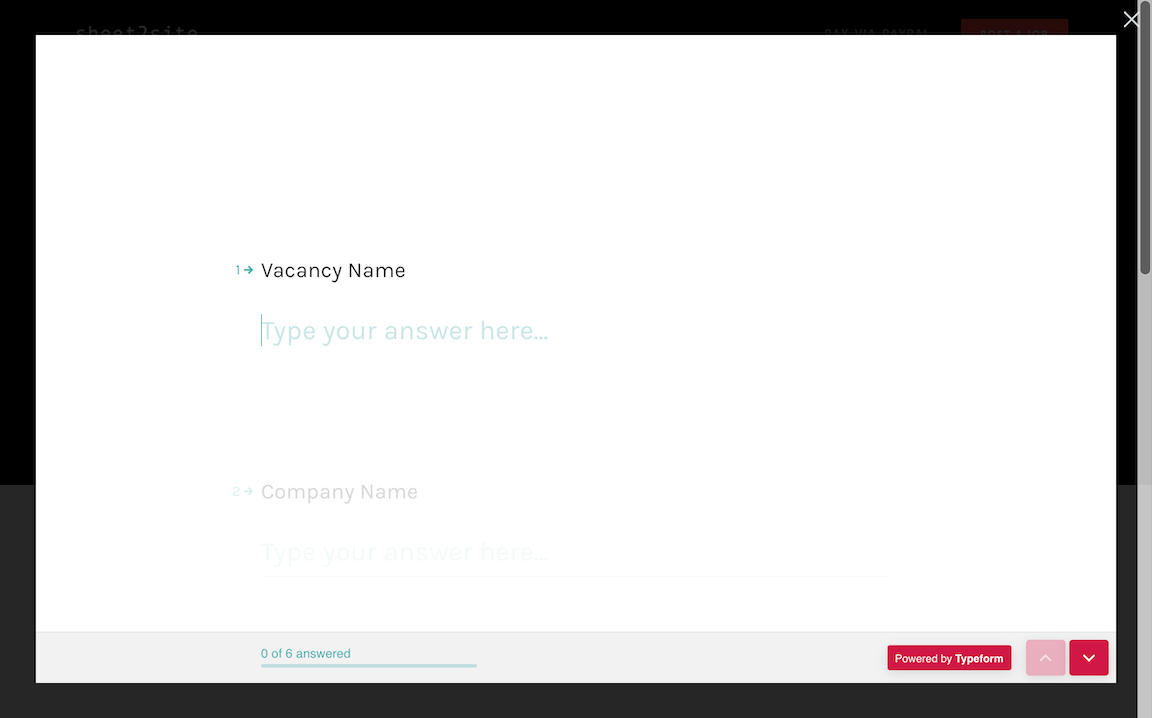
- A link to a detail page
- A link to Typeform pop-up
- A link to Google form pafe
In the Header tab
Header Button Link
and
Header Button Link
you can add your call to action button. It looks like this:
Images
To be able to add images to your website you need to host them somewhere. Here are some options:
Find in Google
The easiest way is just to find some images in
Google Images
, select image that you like make a right click and select
Copy Image Address
Images hosting
- Upload the image: Drag and Drop the image or Choose file
-
Right click uploaded image. Copy Image Address link. It should looks like this
https://i.imgur.com/WYSsP12.png - Start uploading and select an the image
- Open the link that you got.
- Right click uploaded image. Copy Image Address link. It should looks like this
If all your images on your computer the easiest way is to upload them to free image hosting. You can upload 1 or multiple images at once.
Imgur
Imgur is a free hosting that you can upload your image and use on your website.
Bulk Images Upload
Imgur supports bulk images upload. Just select multiple images from your computer and it will upload all of them.
After Right click on each uploaded image. Copy Image Address link and put it to the sheet
ImgBB
ImgBB is another free hosting that you can upload your image and use on your website.
https://i.ibb.co/8DmtBvz/download-1.png
Find on Unslpash
Unsplash is great website where you can find some beautiful, free images and photos that you can download and use for any project
Another cool thing that Unsplash support image editing on the fly by adding special parametrs into URL , so you don't need to use any software to edit your image.
Example:
https://images.unsplash.com/photo-1525183995014-bd94c0750cd5?ixlib=rb-1.2.1&ixid;=eyJhcHBfaWQiOjEyMDd9&auto;=format&fit;=crop&w;=750&h;=400&q;=80&blur;=80
-
&fit;=crop: apply cropping to the image/ -
&w;=750: width=750px -
&h;=400: heigh=400px -
&q;=80: quality of compression: 80% -
&blur;=80: apply 80% blur effect to the image.
Find on unDraw
undRaw is a open-source illustrations for every project you can imagine. You can even customize a color of your illustration.
Display Images from Google Drive
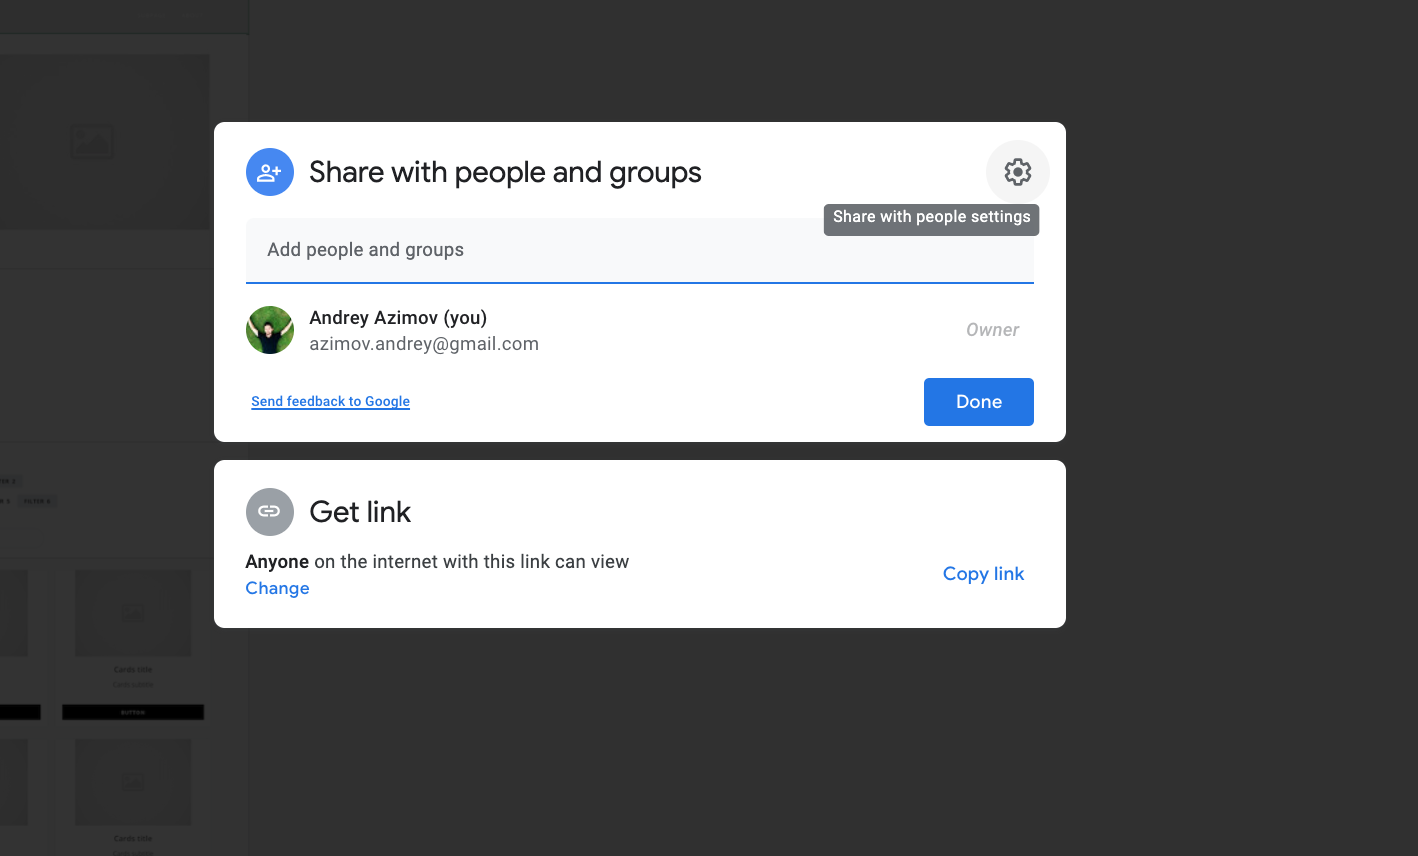
Your Goolge Drive folder can be used as your image hosting. Here is how you can display images from Google Drive in your website:
- Create a folder in a Google Drive
- Upload all of your images there.
-
Click on the folder and select Get Link

-
Change the permission to Anyone with a link can view
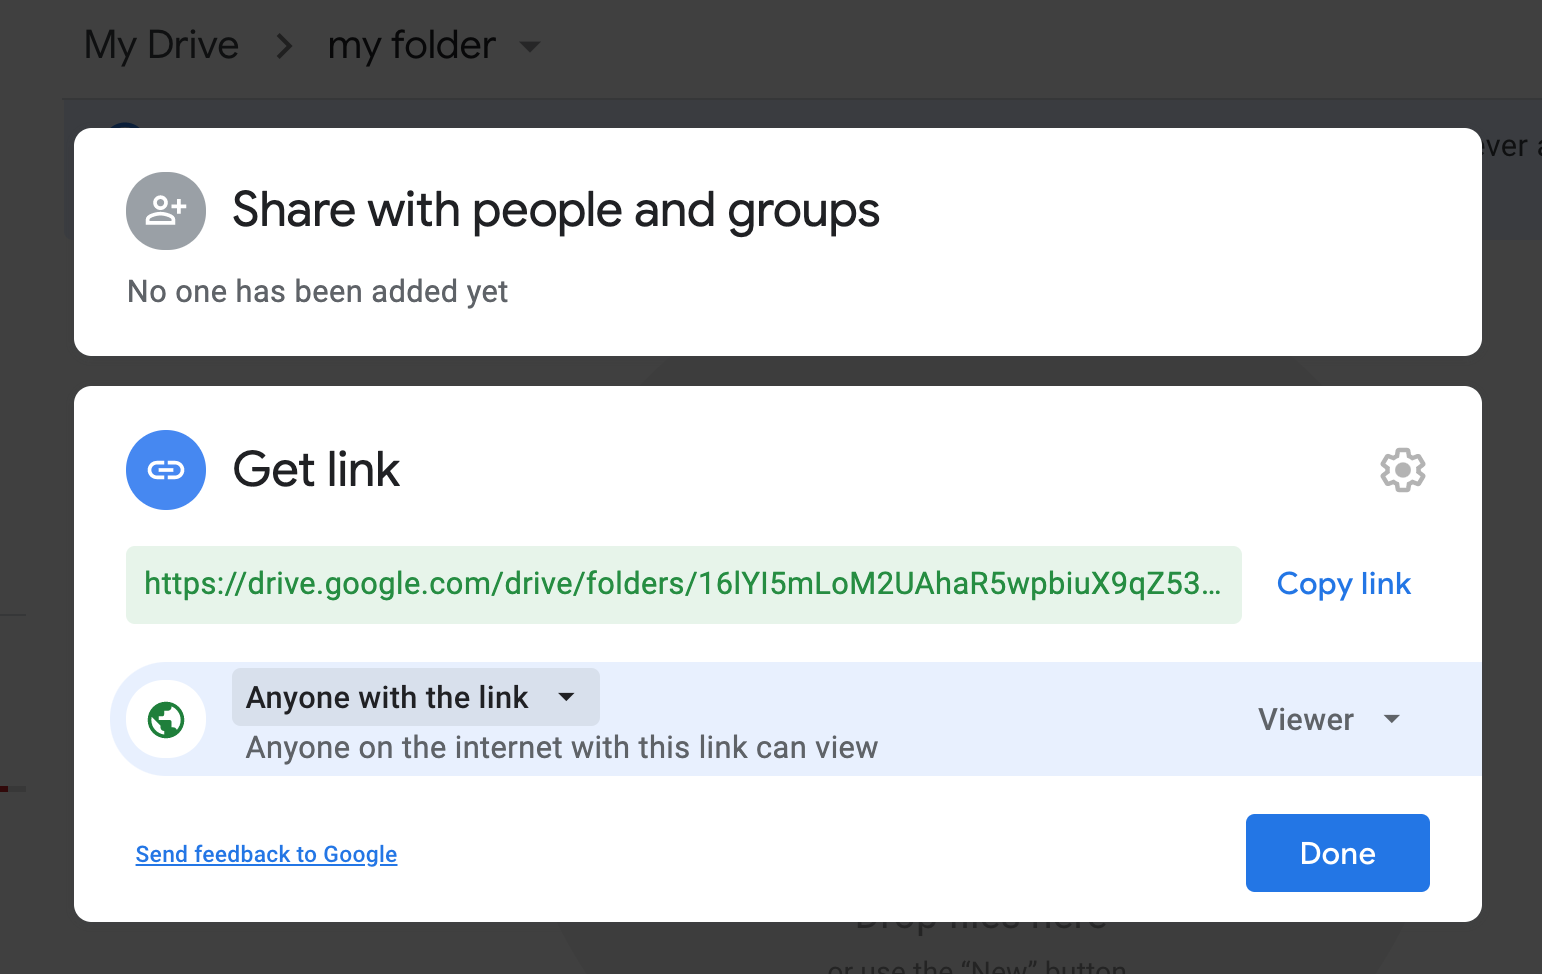
- Done
Nice! Your folder is ready. Now let's get a link to a specific image and put into the spreadsheet:
-
Right click on the image. Get link
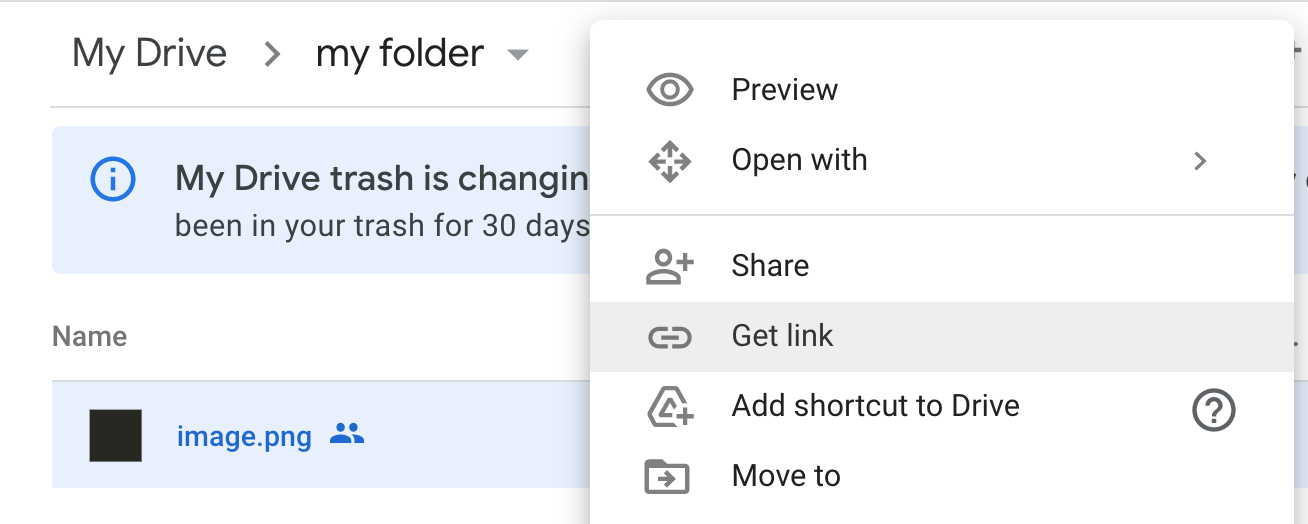
-
Copy the link. It should looks like this:
https://drive.google.com/file/d/1hmguNruAeD-4IMKJDCvfkT_ViJtUbtjb/view?usp=sharing - Done
- Paste it to the spreadsheet
Cards

The "Cards" tab is where your data is. You need to add your data there and select a type from the dropdown for each column:
How to create Cards?
Select data types
Open "Cards" tab
Column types in the row 2 and your header names and in the row 3.
You can delete template's columns that you don't need. They made for demo purpose.
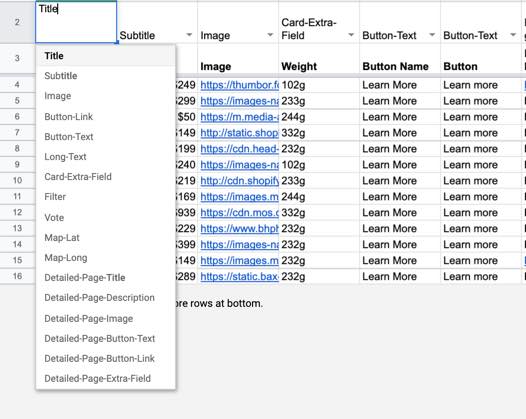
Click to open Google Sheet
Available Column Types:
- Title
- Subtitle
- Image
- Button-Link
- Button-Text
- Long-Text
- Card-Extra-Field (can be many)
- Filter (can be many)
- Vote
- Map-Lat
- Map-Long
- Detailed-Page-Title
- Detailed-Page-Description
- Detailed-Page-Image
- Detailed-Page-Button-Text
- Detailed-Page-Button-Link
- Detailed-Page-Extra-Field (can be many)
Cards Templates
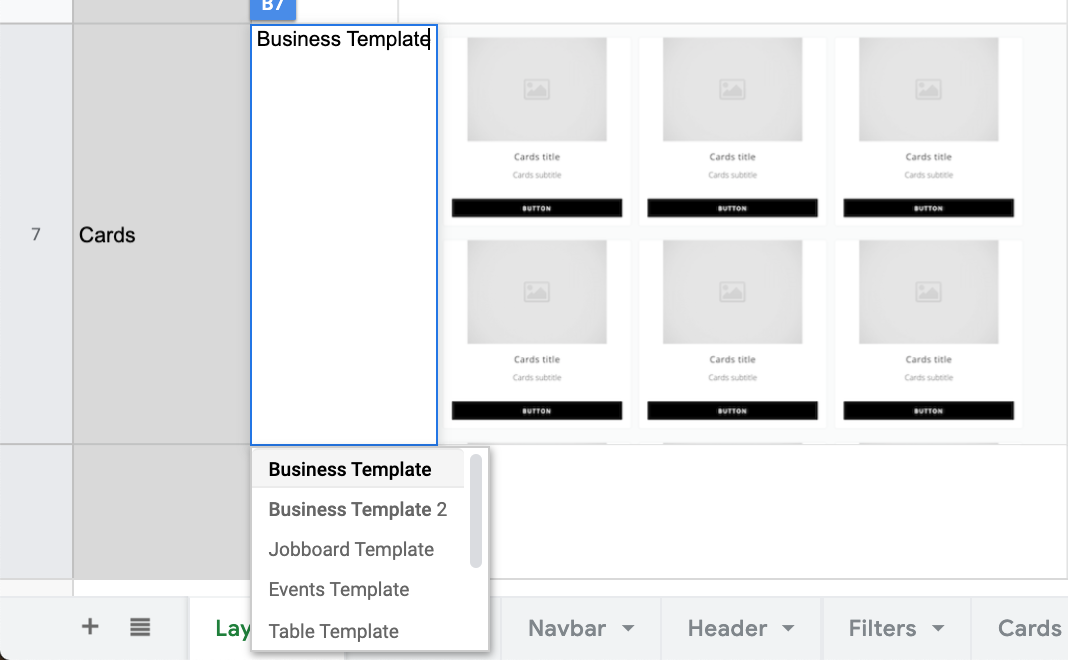
Different cards template are avalible in the "Layout tab".
You can try them all to see how each of them will look like simply selecting them from the dropdown menu in the "Layout" tab.
Your data will stay the same in the "Cards" tab.
- Business Template
- Business Template 2
- Jobboard Template
- Events Template
- Table Template
- Digital Nomads
- Voting Template
Filters
Select filter columns
In the "Cards" tab please select a type "Filter" for each column that you want to apply filtering and the filter buttons will be created automatically.
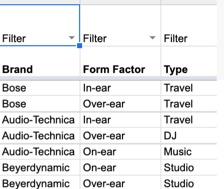
Click to open Google Sheet
1 Filter Column = 1 Filter Category
You can add comma separation in the cell, be be filterable by different values in the same category. Example: Rock, Pop, Jazz
Filter Logic
Different filter logic is avalible in the "Layout" tab.
- Single filters
- Multi filters
- Dropdown (Single)
- Dropdown (Multi)
You can switch or hide them in the Layout tab.
Single Filters
These filters are acting like clickable buttons. When the user click on the the button data will be filtered and show.
1 row of filter buttons = 1 Filter Category Column
Each filter buttons are creating and updating automaticaly from all unqie values in your Filter column that you should select on the previous step.
Users can filter your cards by one single creteria. For example a brand name.

How to use:
- Layout tab -> Filters -> Single Filter
Multi filters
Looks like a Single Filter but users can filter your cards based multiple creterias. For exampe "Brand Name" AND "Type" AND "Style" AND "Price"

How to use:
- Layout tab -> Filters -> Multi Filter
Dropdown (Single)
Unlike of previus filters that where showing all their values at once, these filter values are hidden by a dropdown. When the user click on the dropdown, it will be expanded and the user can selecting its value.
1 Dropdown = 1 Filter Category Column
Drop Down Caterory name is a Filter Column name.
Each filter dropdown is creating and updating automaticaly from all unqie values in your Filter column that you should select on the previous step.
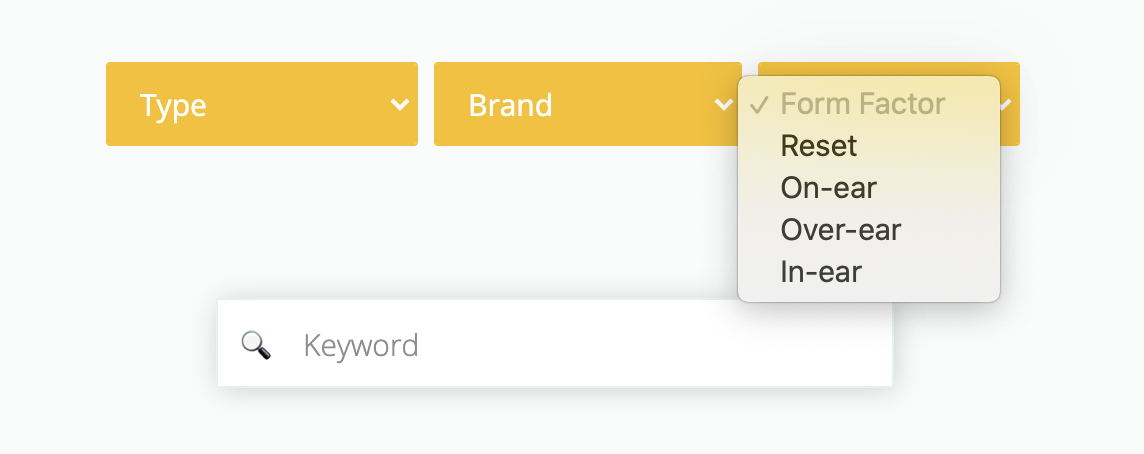
How to use:
- Layout tab -> Filters -> Dropdown (Single)
Dropdown (Multi)
Looks like a Dropdown (Single) Filter but users can filter your cards based multiple creterias when selecting multple dropdown values. For exampe "Brand Name" AND "Type" AND "Style" AND "Price"
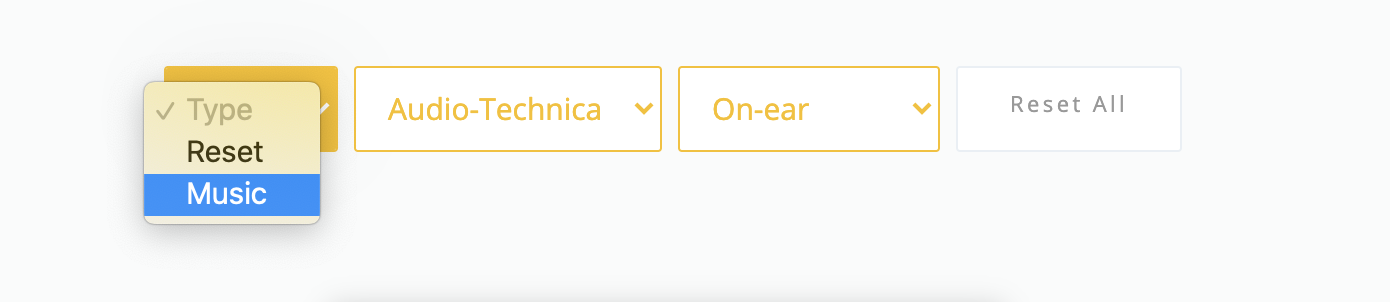
- Layout tab -> Filters -> Dropdown (Multi)
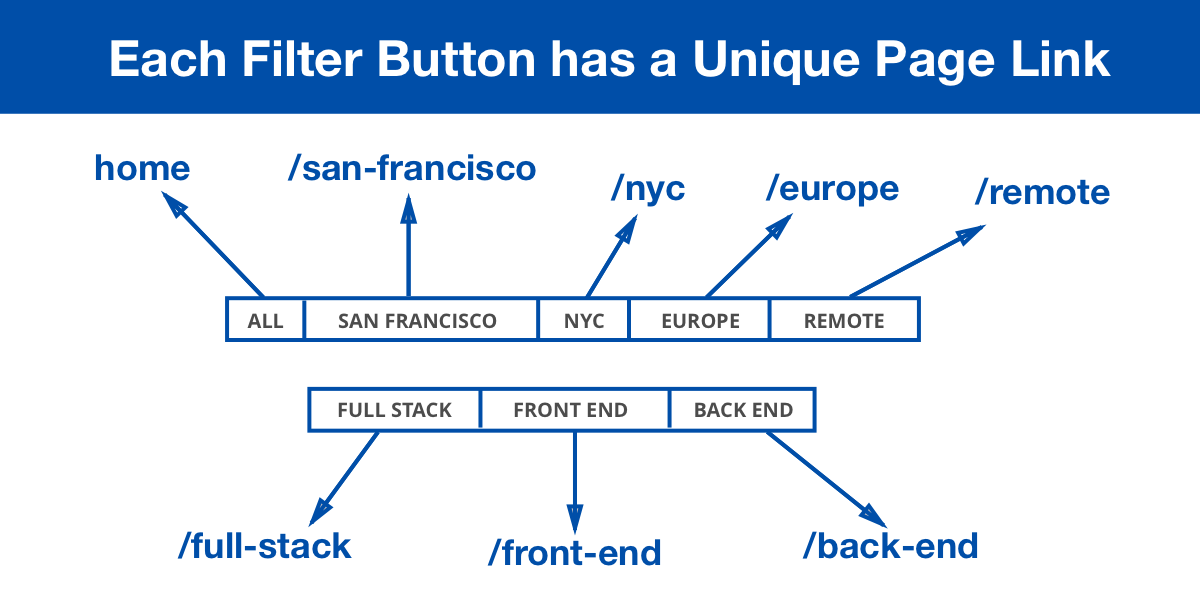
Unqiue URLs for your Filter Pages
Each filter page will have a nice unqiue URL. Examples:
- Single: https://sheet2site.com/templates/business/category-audio-technica
- Multi: https://sheet2site.com/templates/business/category-audio-technica-and-in-ear
All these URLs will be added to the sitemap.
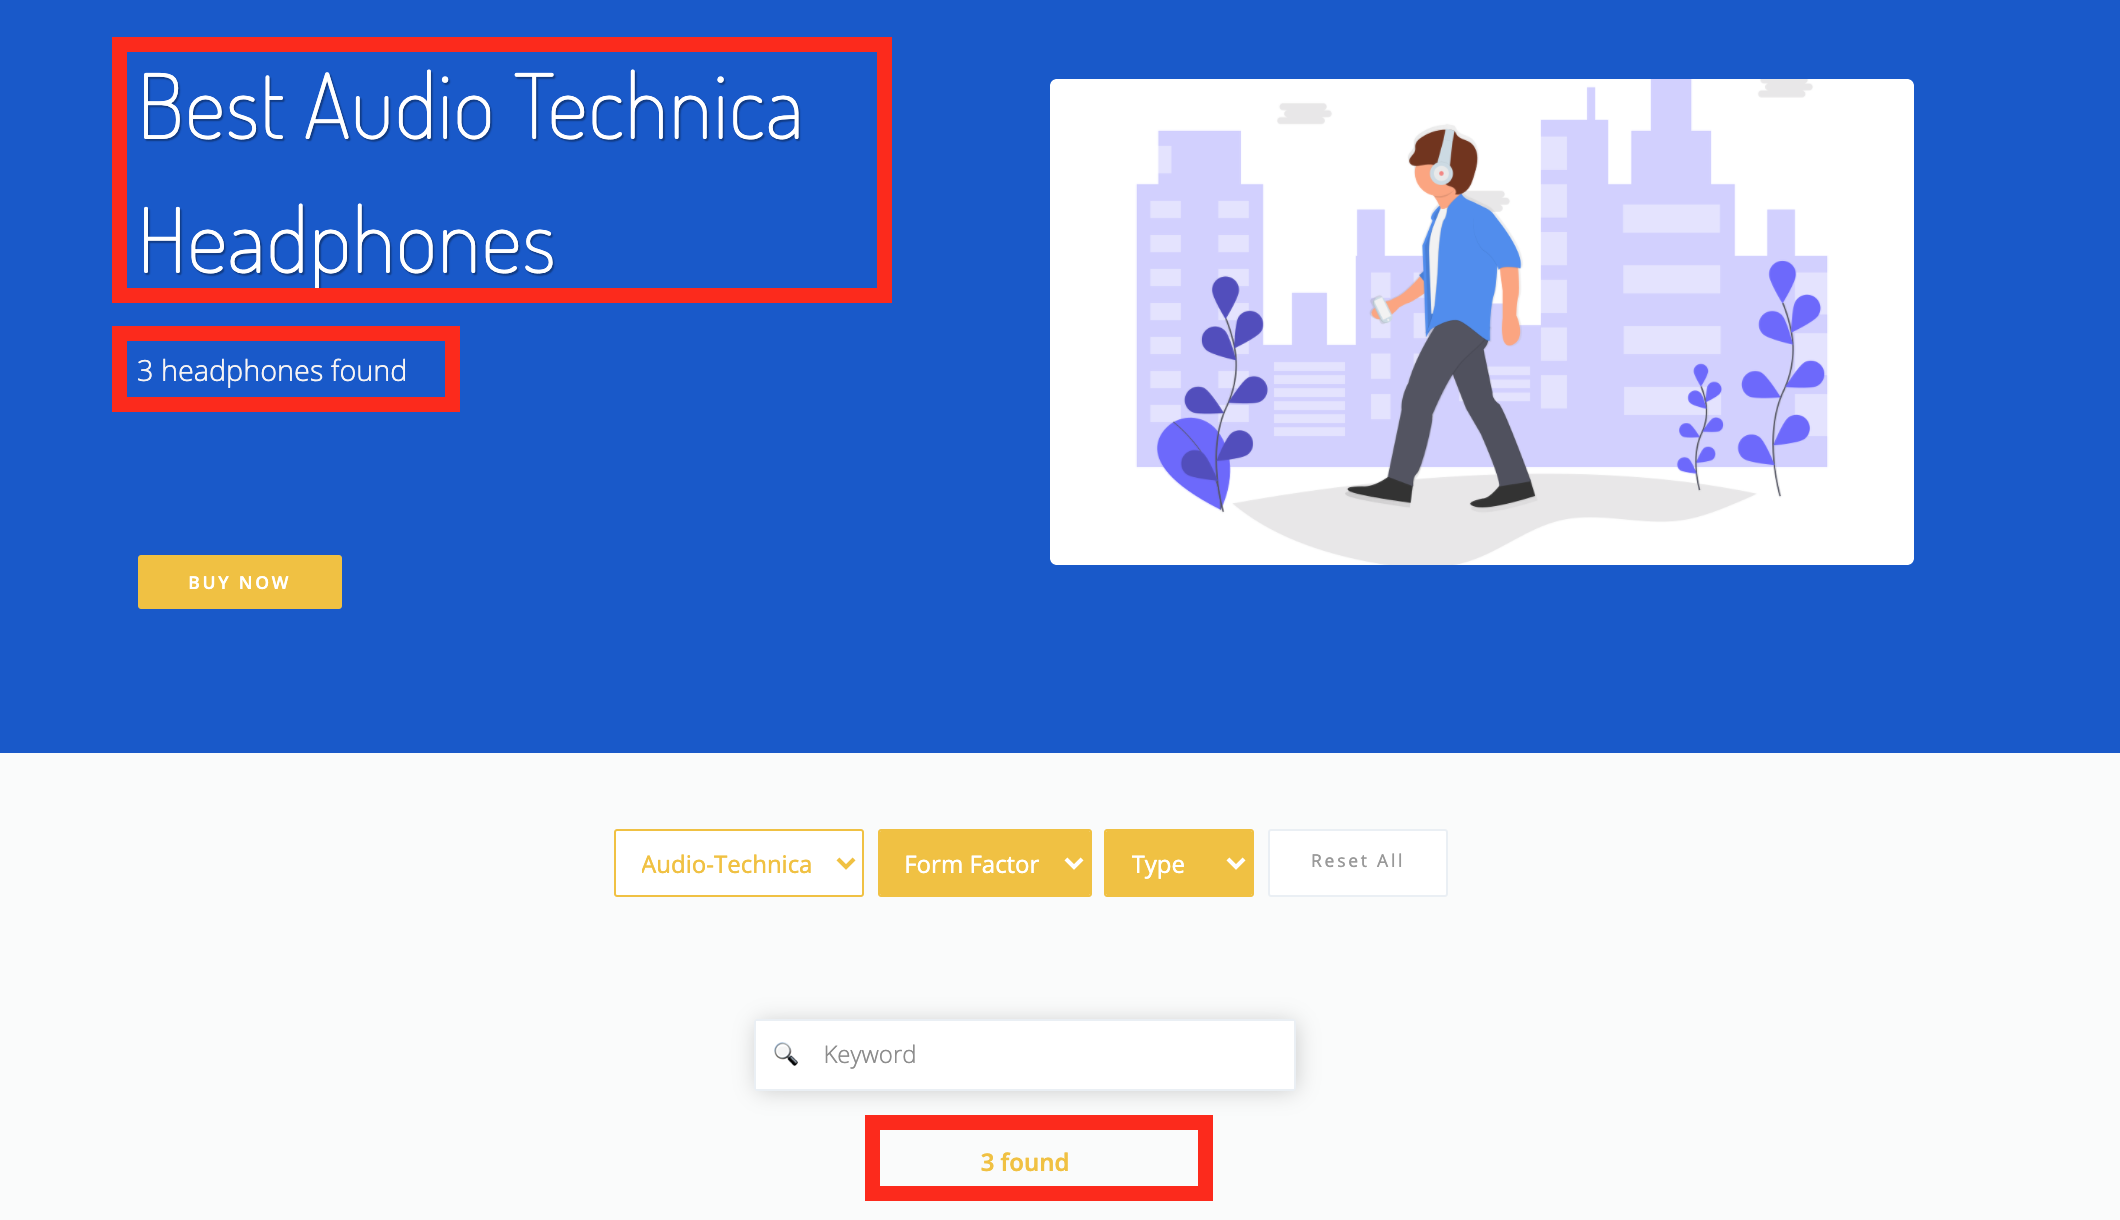
Dynamic Titles on Filter Pages
Since each filter will have it's own unqie page you can customize the text to make unqiue titles.
You can customize each filter header how it will looks like.
Click to open
Click to open
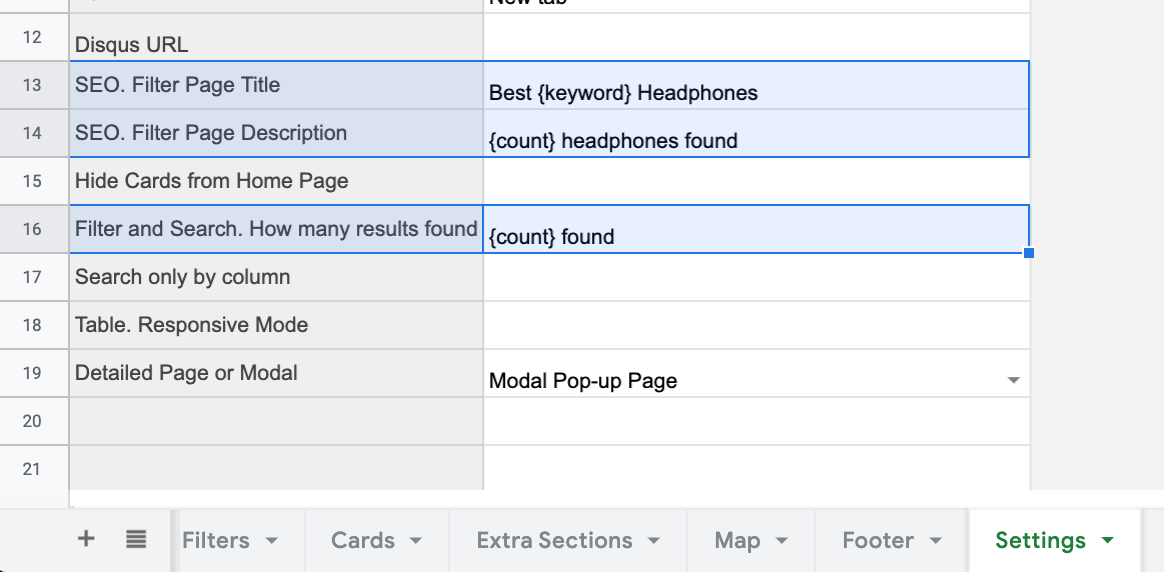
In the settings tab change these fields:
-
SEO. Filter Page Title SEO- header title text pattert -
SEO. Filter Page Description- header description (subtitle) text pattern -
Filter and Search. How many results found- for
You can use these special words as variables for dynamic text on your pages
{keyword}{count}
You should use at least one of these keywords to make it work
Examples:
Best {keyword} Headphones{count} {keyword} Headphones Found{count} Found
Use Google Sheets Formulas for dynamic text values
You can generate a dynamic date, using =TODAY() formula. You can show a months and a year that will always updated automatically as to a current months and a year: August, 2020
Formula example:
=CONCATENATE("{keyword} Headphones ", TEXT(TODAY(),"MMMM"),", ",TEXT(TODAY(),"yyyy"))

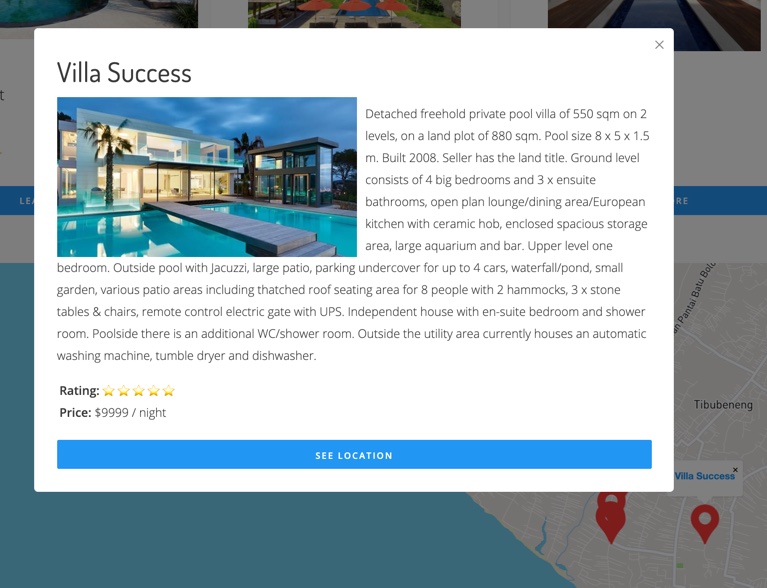
Detail Page Pop Up window
To add more information about the item you can use Detailed Pages (Modal Pop-Up)
Once user will click on the item, the pop-up windown will open with detailed information.
The page url will not change. It's also works in embedded websites.
How it looks like:

Select types
You need select a type for each column in the "Cards" tab that have data for your Detailed Pages (Modal Pop-Up):
- Detailed-Page-Title
- Detailed-Page-Description (support's Markdown syntax)
- Detailed-Page-Image
- Detailed-Page-Button-Text
- Detailed-Page-Button-Link
- Detailed-Page-Extra-Field (can be many)
Detailed-Page-Description column supports Markdown syntax so you can format your page with header titles, lists, new lines, etc. More info here: https://sheet2site.com/markdown
Click to open Google Sheet
Set the Setting
In the settings tab make sure that you set Detailed Page or Modal to: Modal Pop-up Page
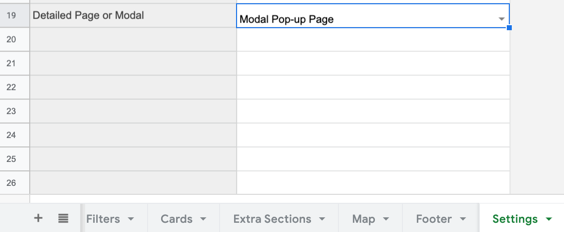
Click to open Google Sheet
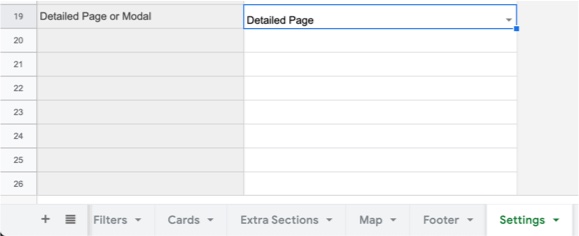
Detail Page Sub Pages
With Sheet2Site you can create detail pages to show more detail information in the separate url.
For SEO is important to not just have a one page website. Google likes websites with more pages and good content. To be able to do it, you can create more pages which will show detailed information.
How it looks like:

Unique URLs
Pages will have unique url.
The slug will be created automatically from the title of the Card
URL examples:
-
Sheet2Site:
https://api.sheet2site.com/api/v3/index.php/?key=1iG2CItl610VWam2M3kx-5HJU5N_nqUzJ4hFHI9FMKaU&page=rolex-oyster-perpetual-explorer
-
Custom domain:
example.com/rolex-oyster-perpetual-explorer
Sitemap
Each of these pages will be added to the sitemap.xml (on custom domain) which will be good for SEO.
Select types
You need select a type for each column in the "Cards" tab that have data for your pages. The same as for Modal Pop-up.
- Detailed-Page-Title
- Detailed-Page-Description (support's Markdown syntax)
- Detailed-Page-Image
- Detailed-Page-Button-Text
- Detailed-Page-Button-Link
- Detailed-Page-Extra-Field (can be many)
Click to open Google Sheet
Detailed-Page-Description column supports Markdown syntax so you can format your page with header titles, lists, new lines, etc. More info here: https://sheet2site.com/markdown
Set the Setting
In the settings tab make sure that you set Detailed Page or Modal to: Detailed Page
You can switch this setting to see the difference between Detailed Pages and Modal. Types in the Cards tab will be the same, so you don't need to change them.
Click to open Google Sheet
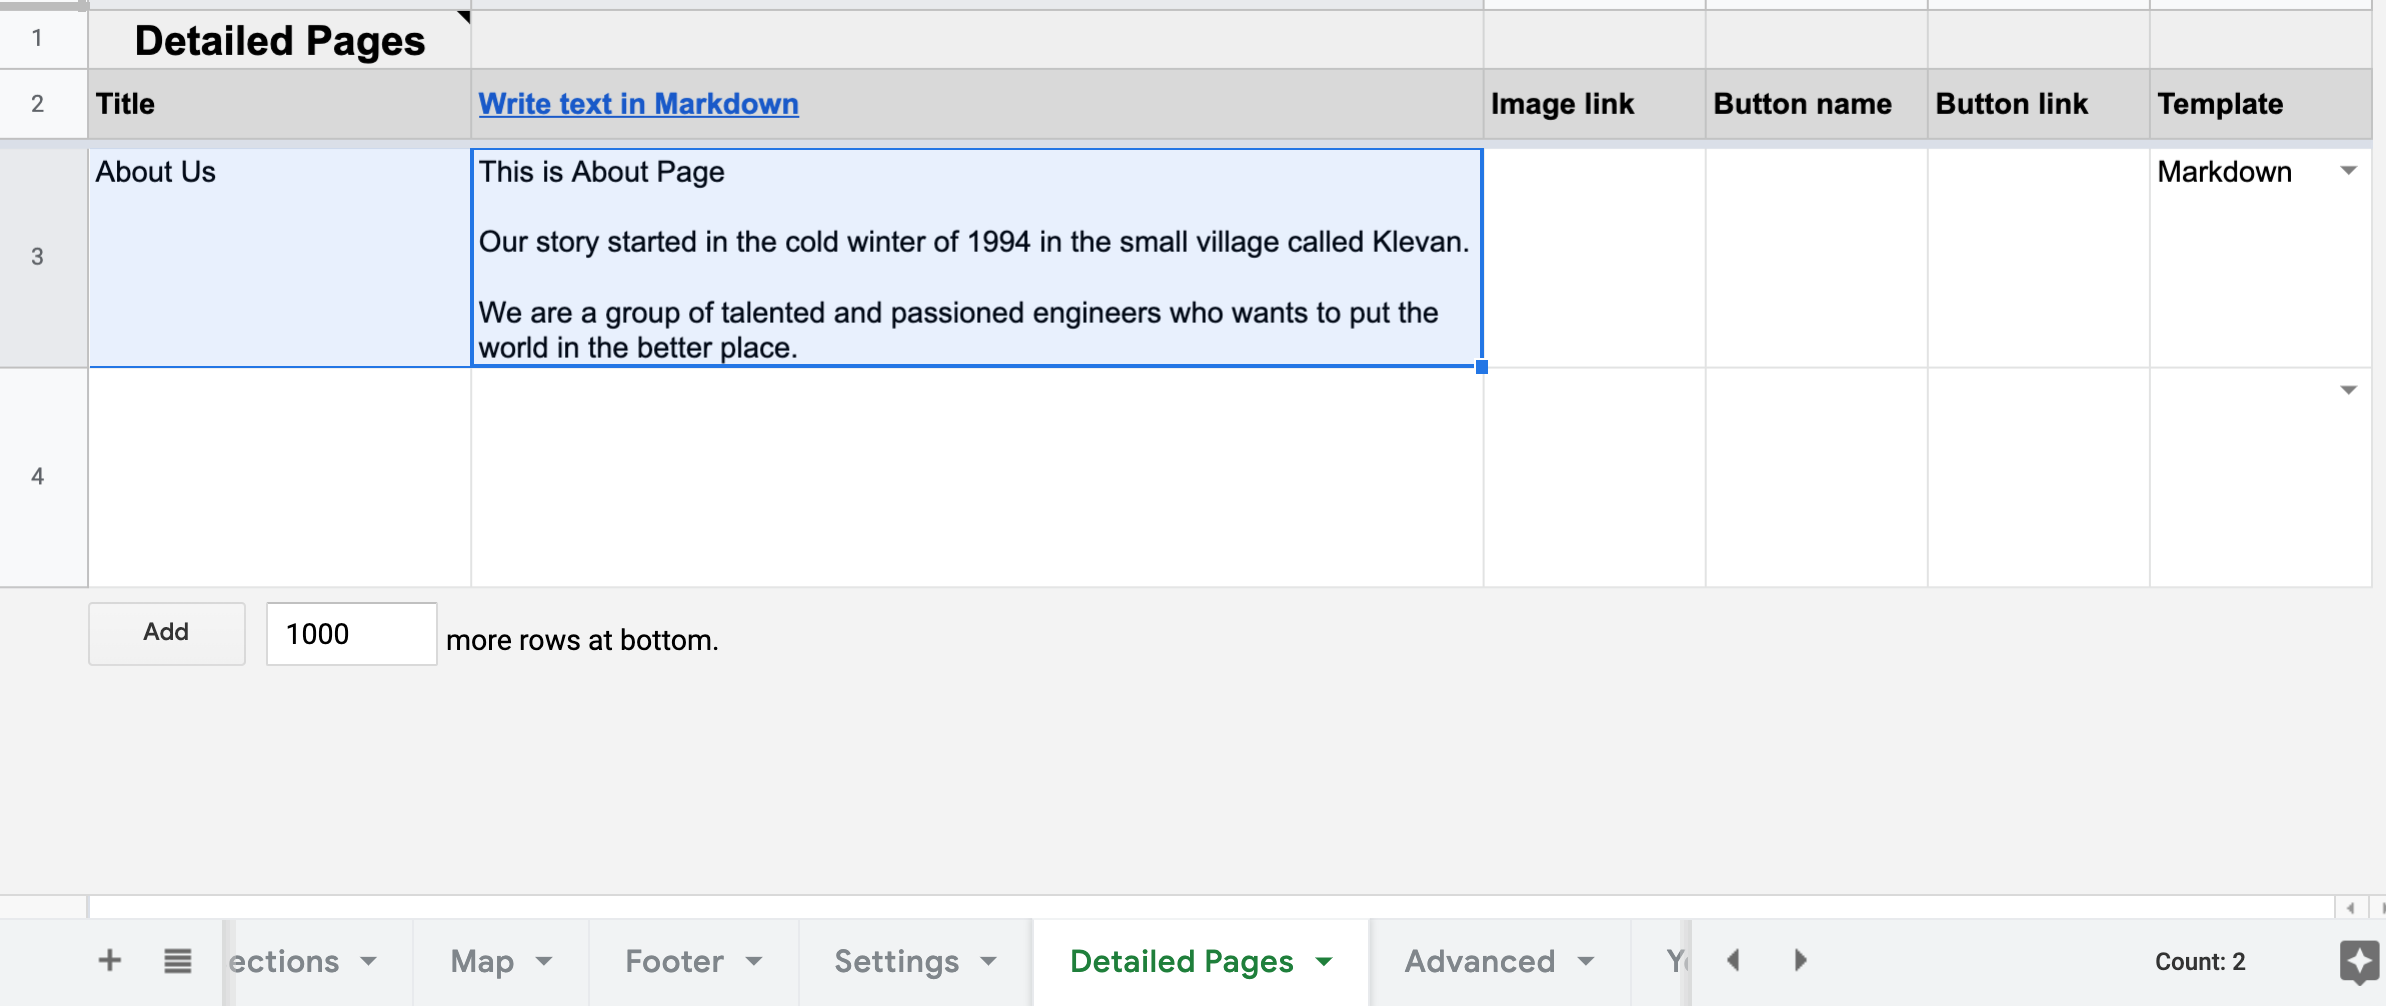
Detail Page About
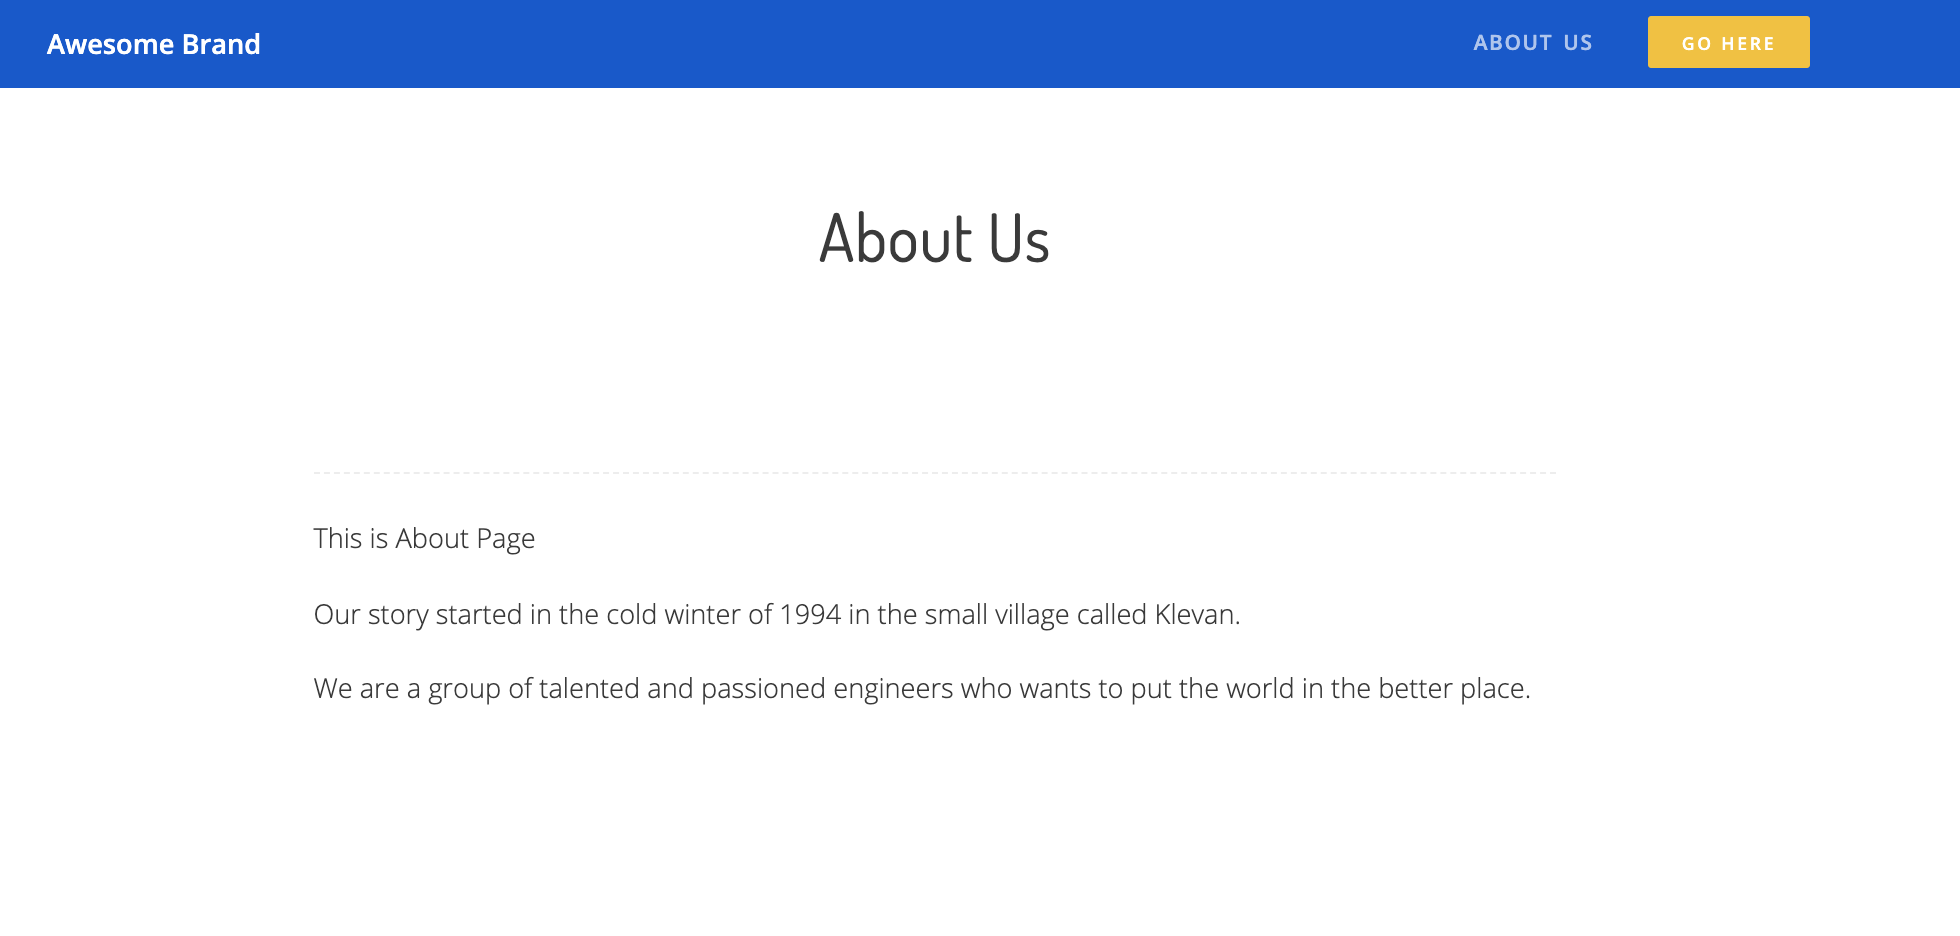
Click to open
You can also create a simple pages like About, Contact us, etc.
Just open a "Detailed Pages" tab and add there your title and the text.
You can also add an image and the button with a link.
All these pages will be automatically added to the website's navbar, so your users can find them.
The slug will be created automatically from the title of your page.
Please use Template: Markdown
Click to open
QR Codes
QR codes becomes very popular these days and you might want to create them and add to your website.
What is a QR Code?
QR Codes is a technology that allows to open links very easy in 1 click just using your camera app. When the user will scan QR code image, your phone will recognize it and conver into a link to will be open in the browser. It can be any link, for example a link to a form or detailed page or restaurant menu or a link to download an app.
Luckily for us it can be done directly in Google Sheets for free using one simple formula.
How to create a QR Code in Google Sheets?
Please using these steps to create a QR Code.
- Open your Google Sheet
- In the cell add this formula
"https://chart.googleapis.com/chart?chs=150x150&cht=qr&chl=example.com"
Sheet2Site will recognize it and will change it to an image.
You can also use it in more dynamic way. Instead of writting each website manullay you can change it to a refference to a cell.
Example: "https://chart.googleapis.com/chart?chs=150x150&cht=qr&chl=example.com" & A1
Map
You can add a map to your website:
Click to preview
To add a map please go to the Layout tab in your Google Sheet and switch state Show
ON
.
Select types
You need select a type for each column in the "Cards" tab that have map information (lat and long).
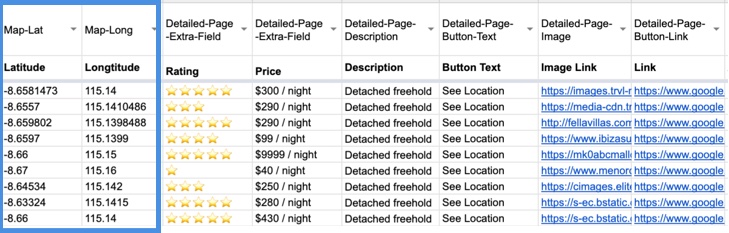
Click to open Google Sheet
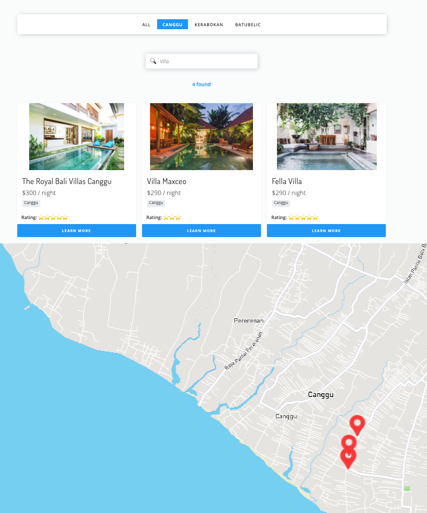
Maps and Filters
Once the user will click on a filter (let's say a neighborhood), the map will also filtered automatically and show only filtered locations
Click to open
Link will also looks nice: https://www.sheet2site.com/templates/real-estate/category-canggu
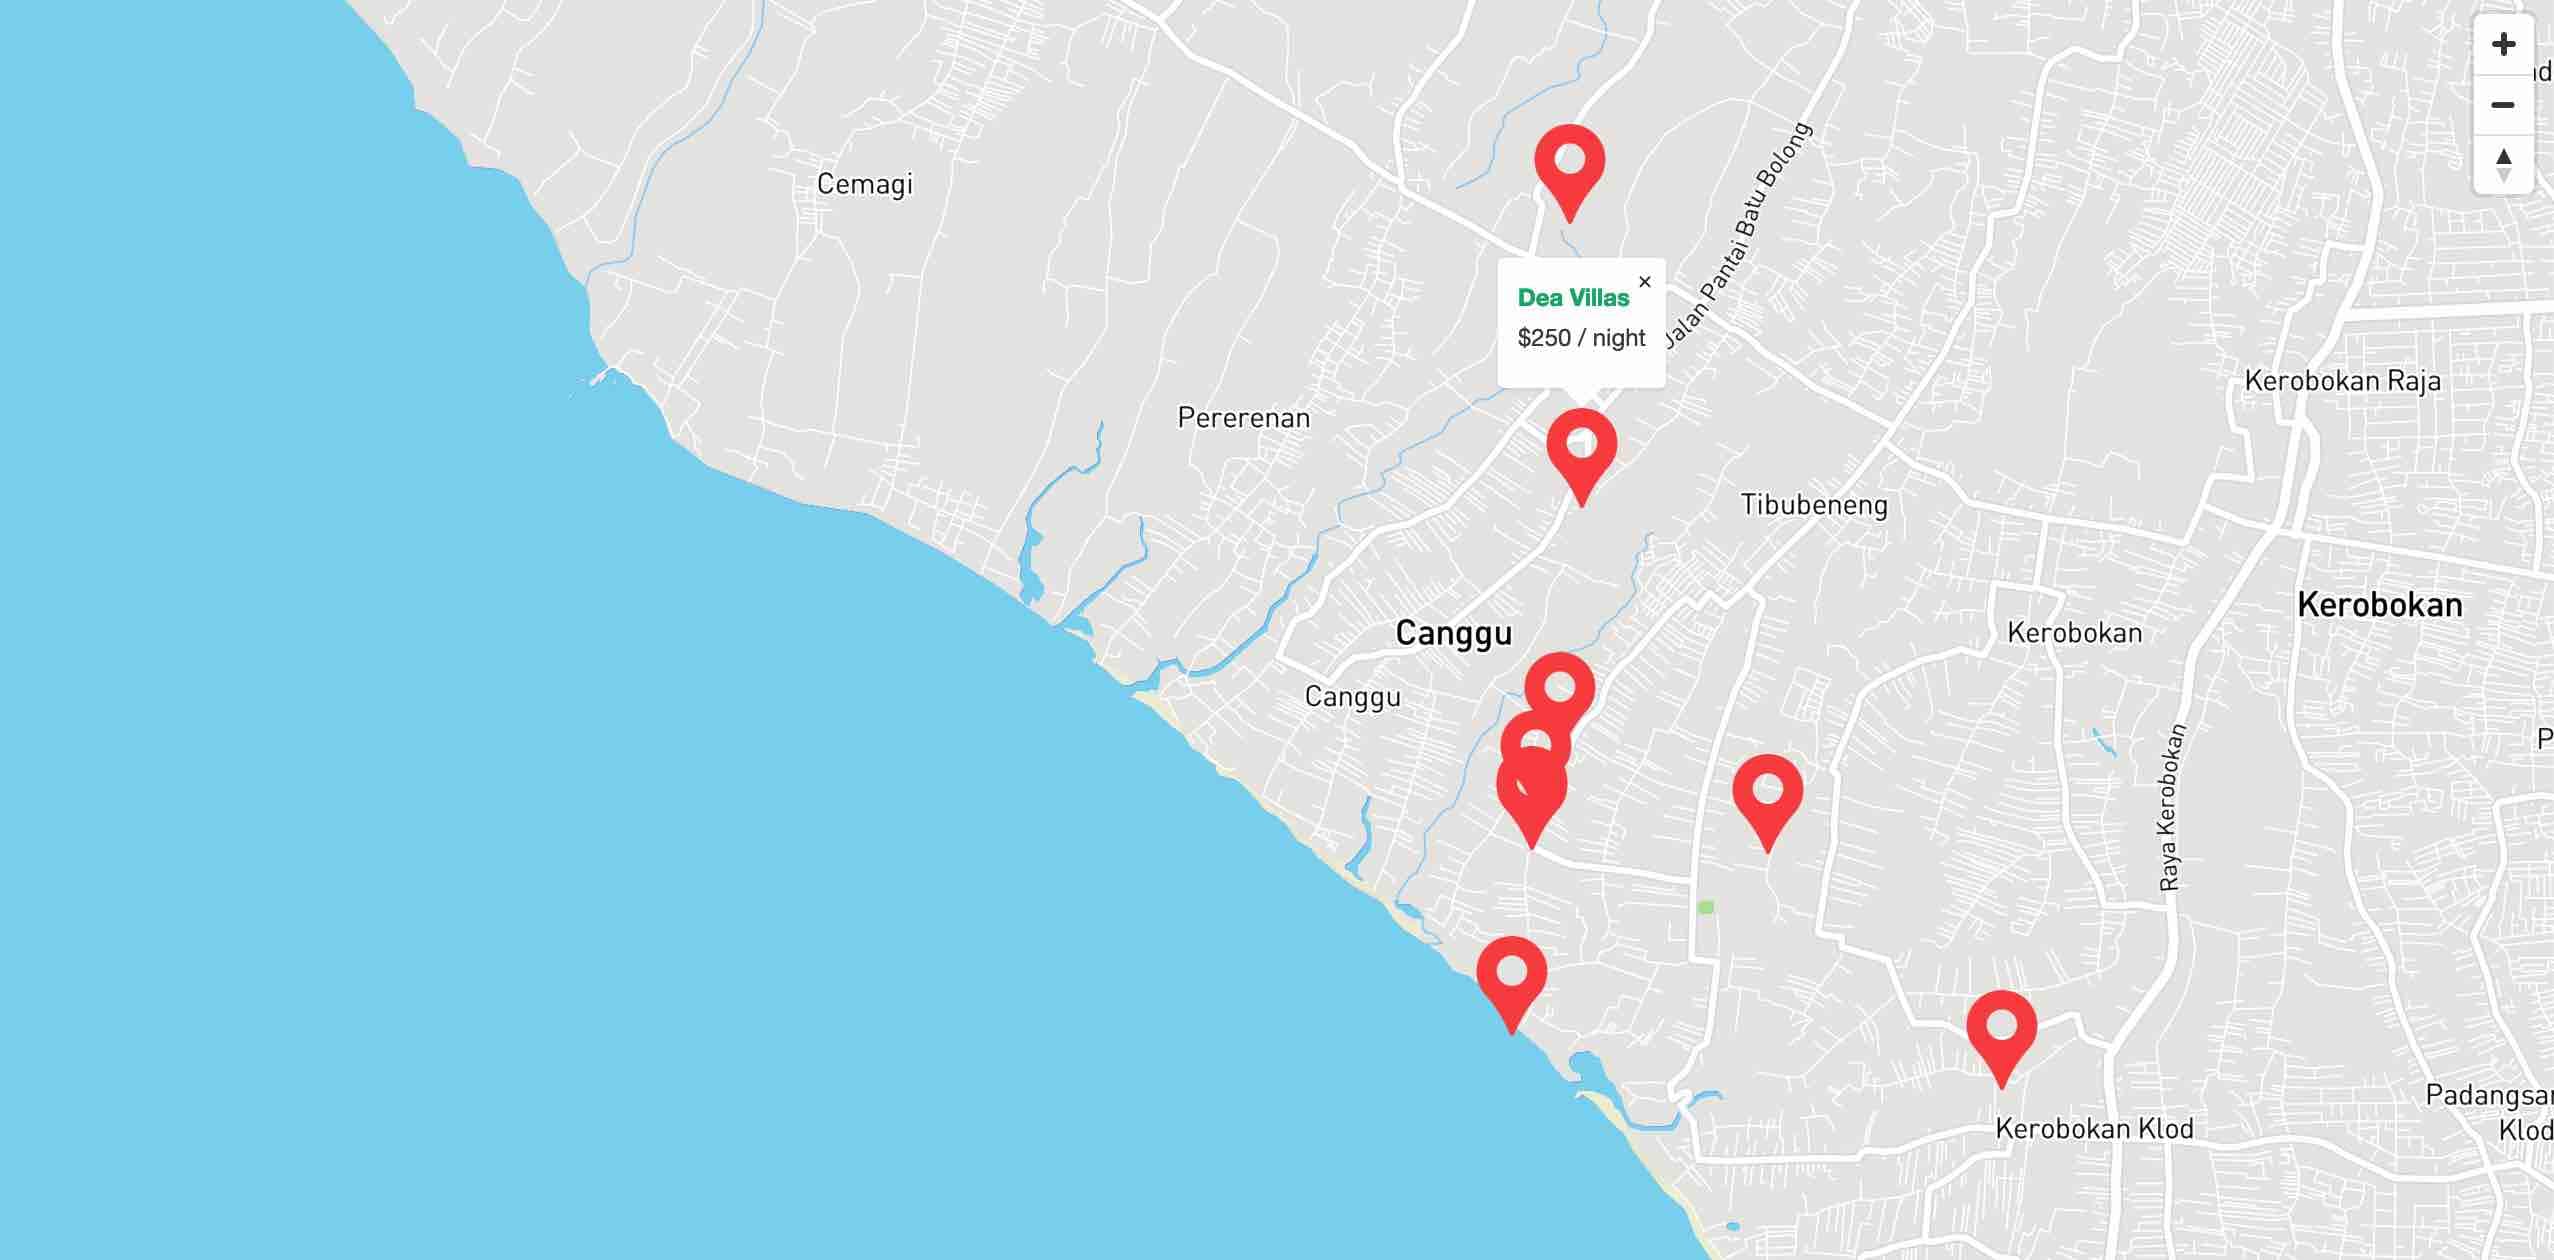
Maps and Detailed Pages (Modal Pop-up)
It makes much more sence if there will be some additional information showing up when the user will click on the location of the place:
Click to open
Click to open
Maps settings:
In the Map tab you can add some settings:
-
Zoom Level- how close you want to show your map from 1 to 15, where 15 is the maximum zoom -
Map center Long- your maps longitude cordinates -
Map center Lat- your maps lattiture cordinates
Table Template

Important: All below working only in table template
Table template allows you to make from your Google Sheet as a nice looking table on your website. You can embed it to your existing website or create full a website.
Using your own table
If you have your own table, please select a Teble template first and paste your table into the Cards tab. Template data will be deleted.
Default Sorting
When the user loads the webiste, the initial sorting of the table is the same as in your Google Sheet. If you will change the sorting in your Google Sheet, the website's table sorting will change as well
Column Sorting
Each column can be sorted separately when you click on Table's header. Data type of the column is reacognizing by default.
Current types that are supported:- String
- Date
- Number
- Currency
- 2020-03-21
- 20000
- 20,000
- $100,000
- 40%
Important!
To identify column types correctly please do not add different data types in the cell. For example: You can have a "$100,000" and "Not exist". This will do the sorting not correctly. Please leave the cell empty.
To remove errors like N/A you might use IFERROR formula.
Cell types
If the cell has there data it will shot this cell in a spefific way like a link or an image.- Images Links - if the link has
.jpeg,jpg,png,unsplash,unsplashtable will show the image - Links - if the link has
http,mailto:it will be shown as a link with a highlighted color.
Search
Searching is executing by all cells in the sheet. If the data is exist in any cell it will be shown.
If you only want to search only by certain columns, you can add a zero based comma separted list of column numbers that you want to include in the search in the Settings sheet, under the option 'Search only by column'.
So for example, if you only want to search based on your first column, set the 'Search only by column' value to 0. If you want to exclude the 3rd column then the value would be: 0,1,2,4,5
Filters
To use filters in a table template you need to add -Filter before each column where you want to apply filtering. Like this:
Also don't forget to add each filter in the Filters tab:
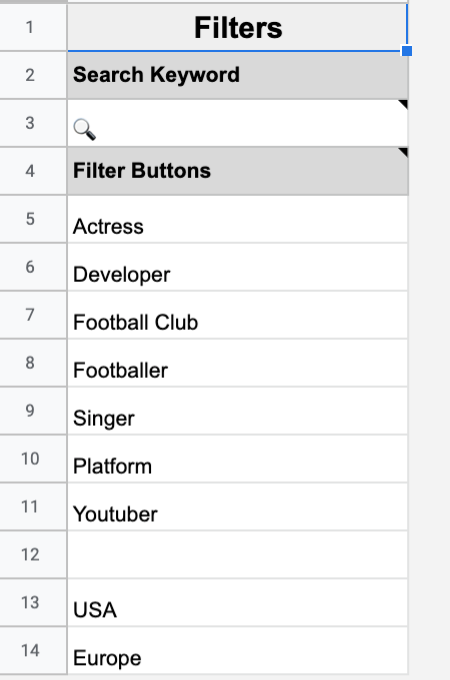
Table Options
Here are some options that you can use in columns headers.
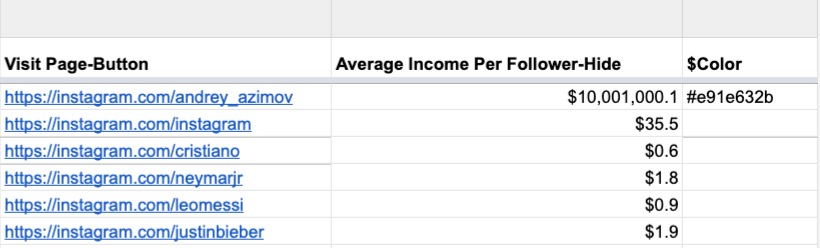
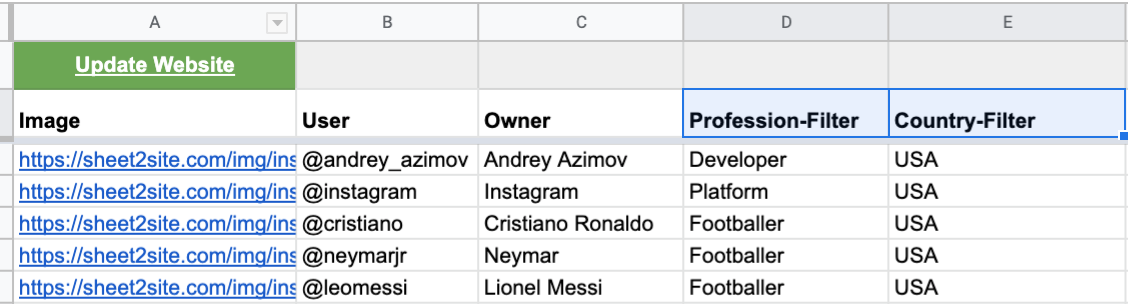
-FilterFilter by this column. ExampleCountry-Filter-Filter-HideFilter by this column but hide it in the table. ExampleCountry-Filter-Hide-HideHide each column. Might be useful for some calculations. Example of how you need to name a column header:Current Year-Hide-ButtonMake a button for each cell of the column. Example of how you need to name a column header:Learn More-Button.
Special Columns
$colorthis column will change the hex code color of the row. It's hidden. Example of how you need to name a row:#f5f5f5oryellow
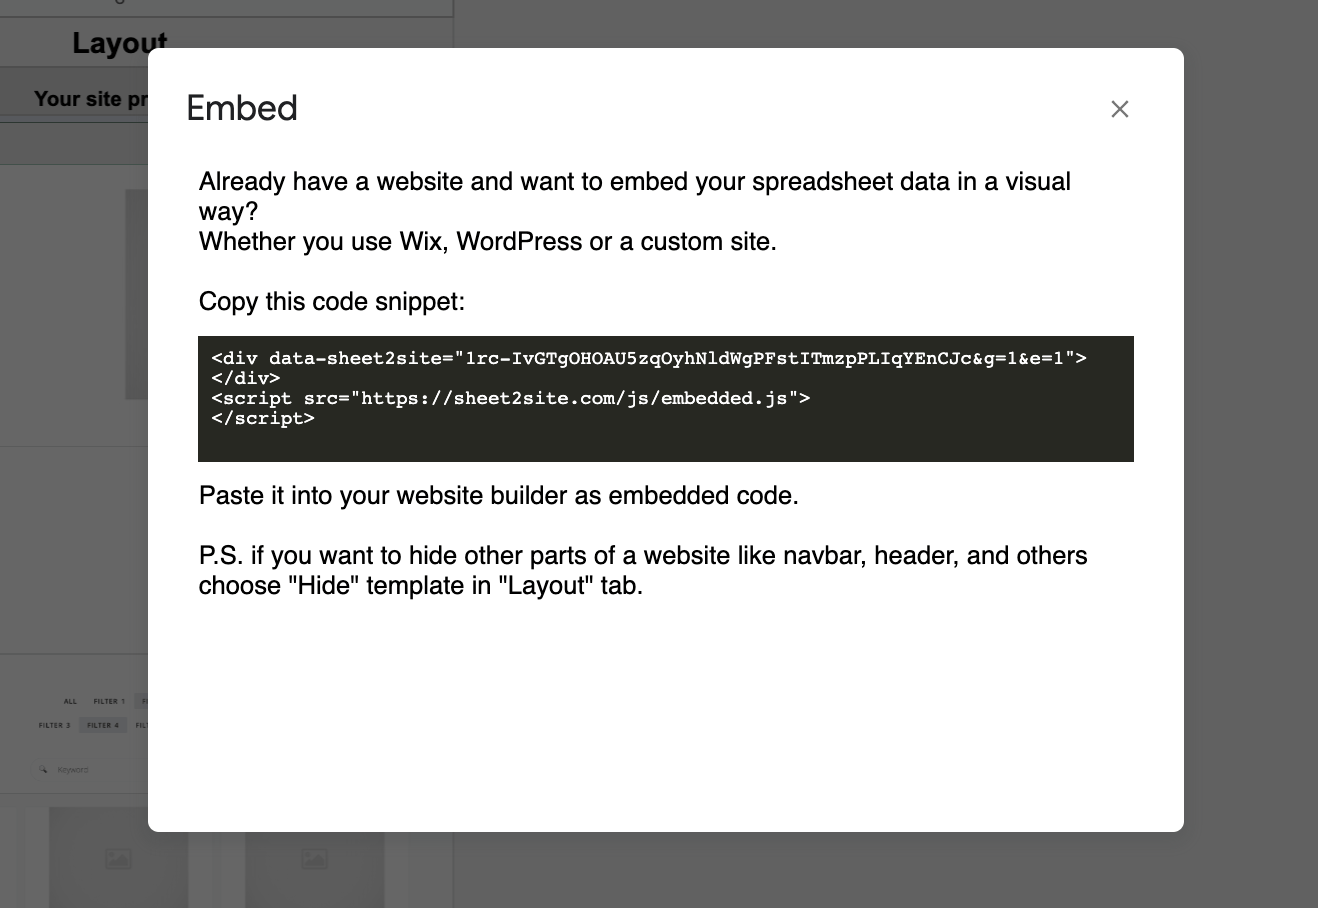
Embed

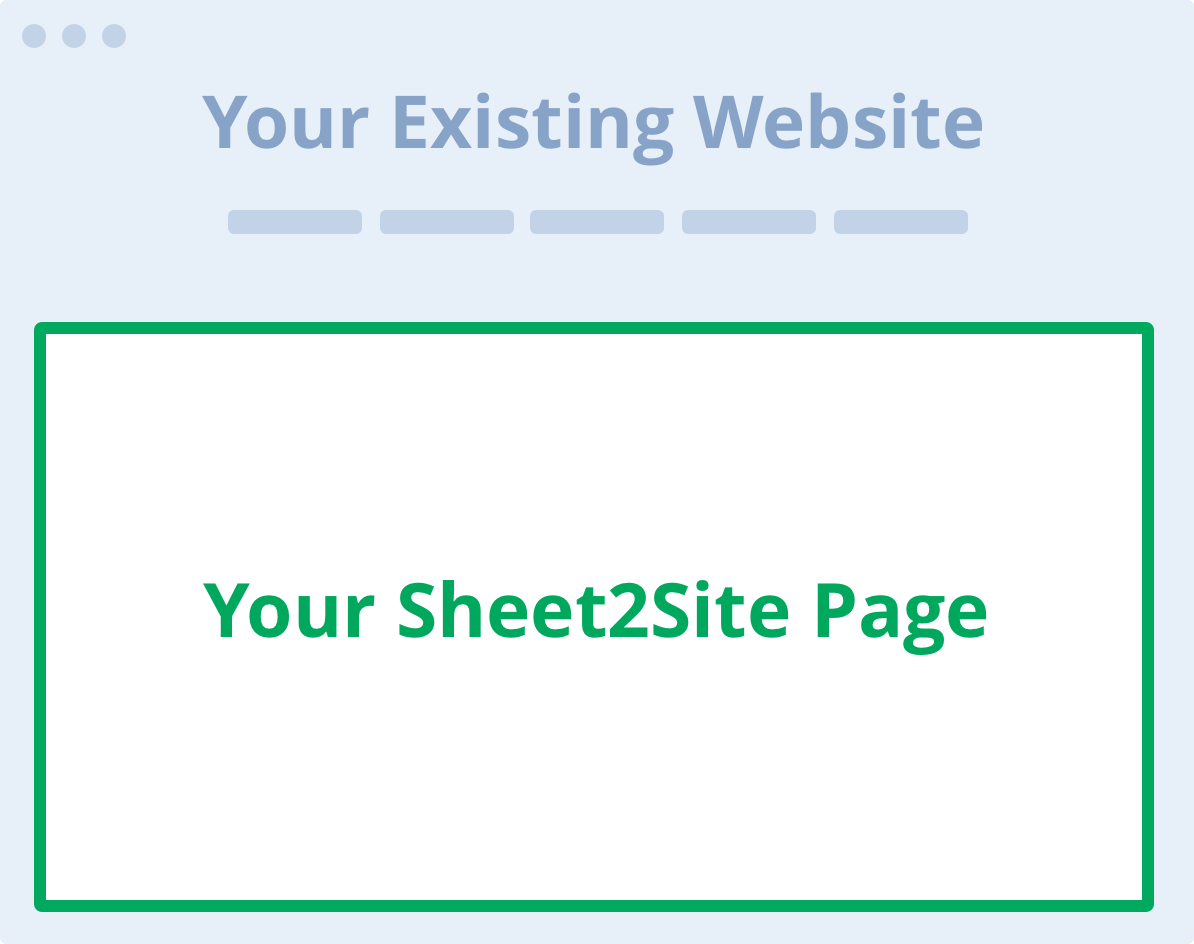
If you already have a website and want to embed your spreadsheet data in a visual way you can easily do it by adding a code snippet
Sheet2Site Embed support all major website builders such as Squrespace, Wix, WordPress, Weebly. It aslo support custom website build with code.
It will keep your logo, navigation bar footer. It will be on a separete page like: yourwebsite.com/directory
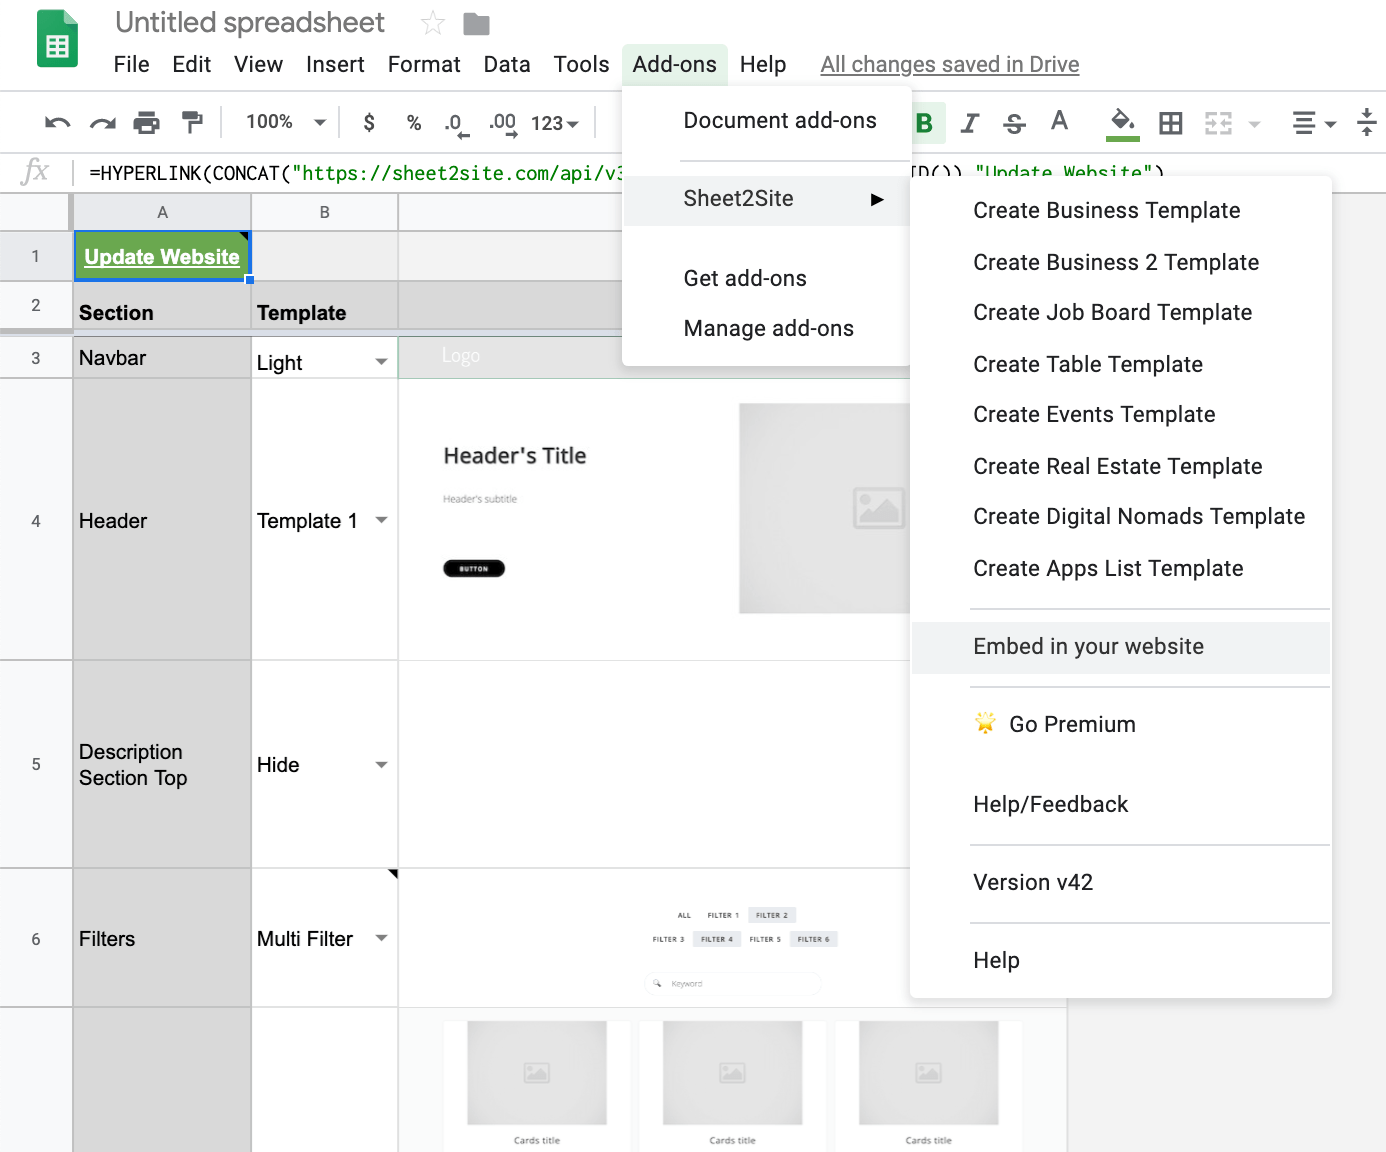
How to embed Sheet2Site to your webiste?
Here is how you can create your own embed site with your own data:
- Sheet2Site Google Sheet add-on must be installed Install
- Template must be created
- Menu Add-ons -> Sheet2Site -> Embed in your website
- Copy code snippet
- Paste it into your website builder as embedded code. Let me know if you need any help.
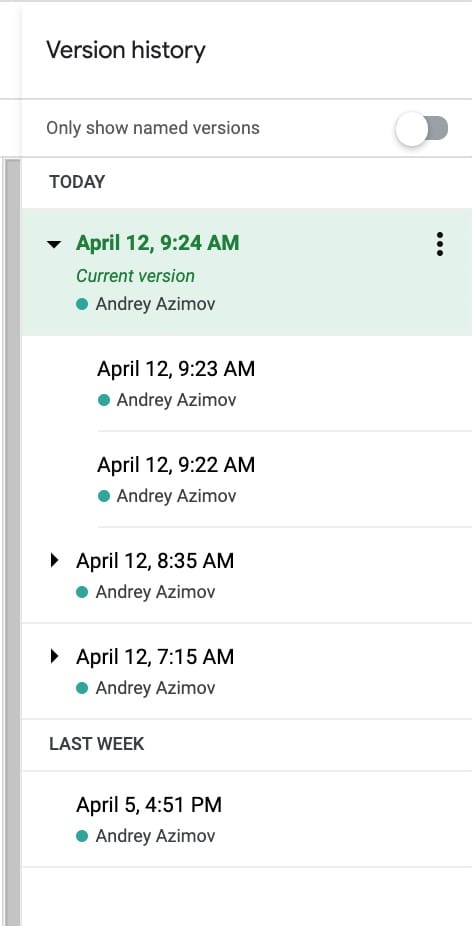
Version History
You can see all your website versions in your Google Sheet.
File -> Version History -> See Version History

You can see all your changes and you can revert back to any of them. It might be very useful when you accidentically meesed-up your website. To do it select a version and press restore in the top left corver.
Google Forms
For most website is important to collect many types of information from the users. You can add a Google Form to your website.
How to create a Google Form
The easiest way to collect data from your users is to https://forms.new
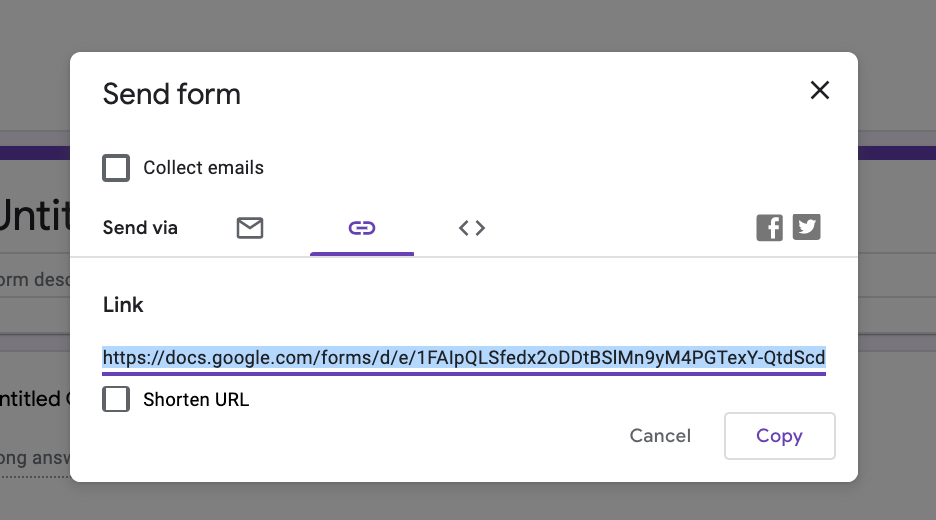
Get the form link:
- Press Send button (top right cornver)
- Select link tab. It should be the second tab from the left
- Copy
Do not use Shorten URL!
Your link should look like this: https://docs.google.com/forms/d/e/1FAIpQLSfedx2oDDtBSlMn9yM4PGTexY-QtdScdcxSpZbRmTLC-IQD_Q/viewform?usp=sf_link
Put this link into Sheet2Site Navbar tab
- Open your Sheet2Site Google Sheet
- Go to Navbar tab
- Add a new row
Link name: Submit (or any other)Type of link: ButtonLink destination / sheet2site URL: {your_google_form_link}Link shown in address bar when clicked: {your_google_form_link}
-
It should be the same link

Now when you will update your website and click on the Button you should see a modal pop-up with the Google Form that should look like this:
Google Form Tips
Here are some useful tips about Google Forms which can help you to automate some typical action and make your life easier.
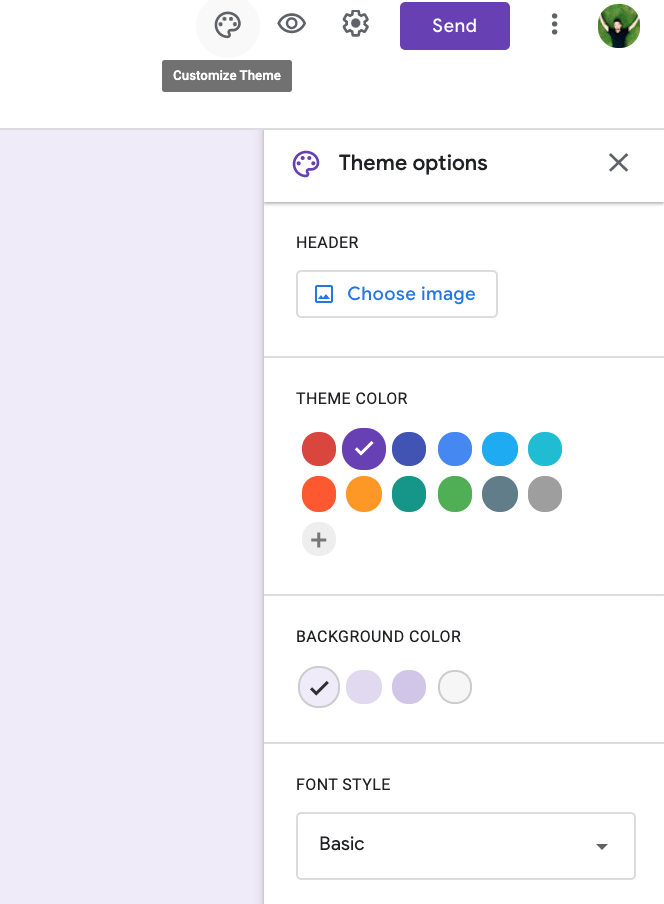
Tip 1: Customize color and style
You can custimize your Google Form style. For example:
- Header Image
- Theme Color
- Background Color
- Font Style
To change all of these things please click on paint palette icon on the top right corner. Changes will be save and updated automatically
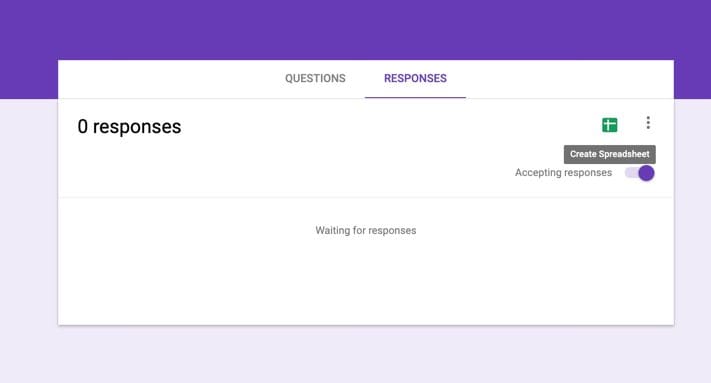
Tip 2: Save responses to Google Sheet
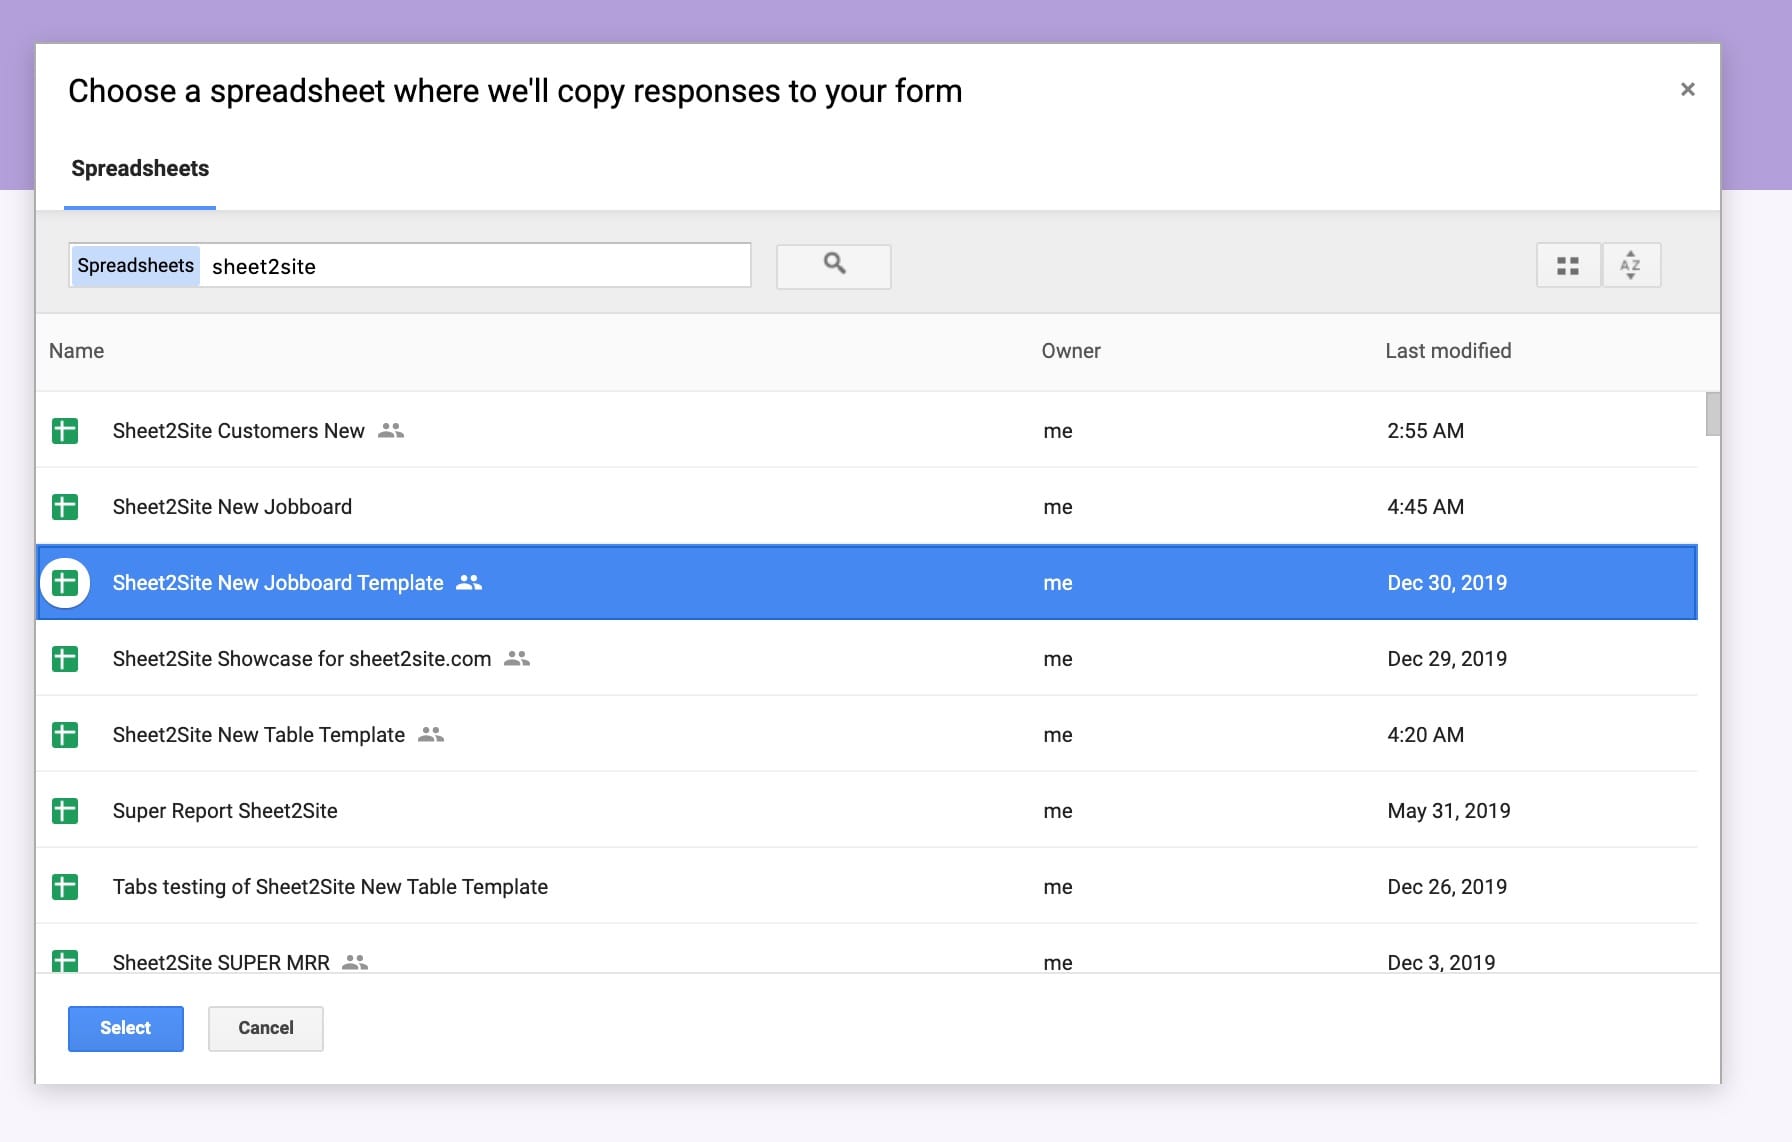
You can save all your form responses to the Google Sheet. You don't need to use Zapier or any other third parties tools. Google Forms support Google Sheet export automatically and it can be setup just in a couple of seconds:
1. Go to responses tab in your Google Form and select "Create Spreadsheet"
2. You can create a new spreadsheet or select an existing one.
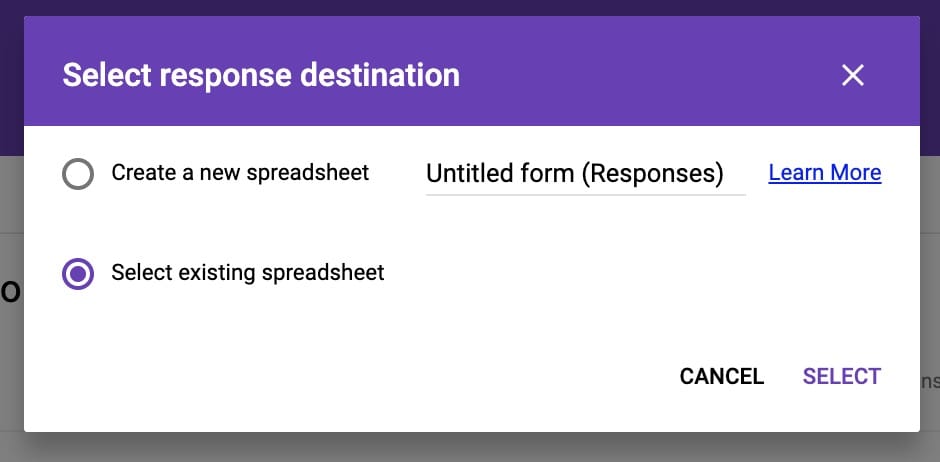
2.1 If you want to automatically add new responses your Sheet2Site website, please select your Sheet2Site Google Sheet:
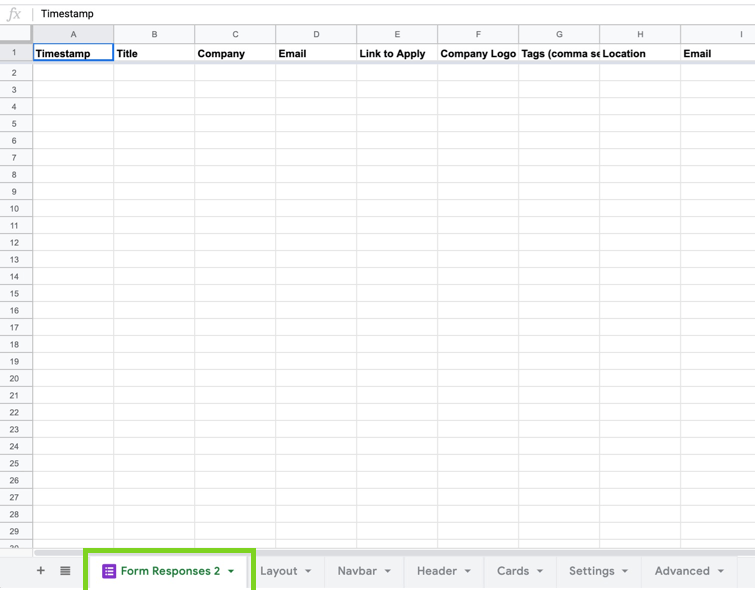
3. You should see a new tab that was created in your Google Sheet.
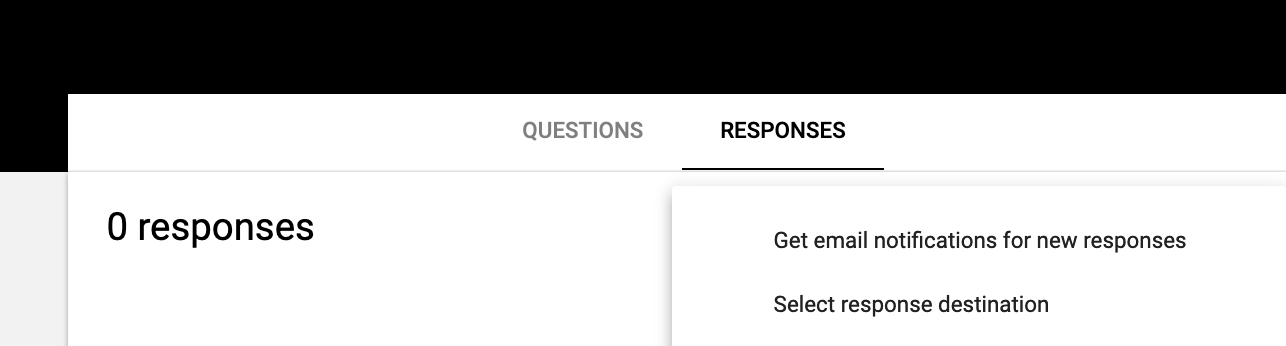
Tip 3: Email notifications for new responses
To know when some will submit the form you can active email notifications, otherwise you will need to open this form regulary to check if someone submit it or no.
How to enable Google Form email notifications if someone will submit the form
-
Create a new form
forms.newor open an existing one - Responses
- Click 3 dots
- Get email notifications for new responses
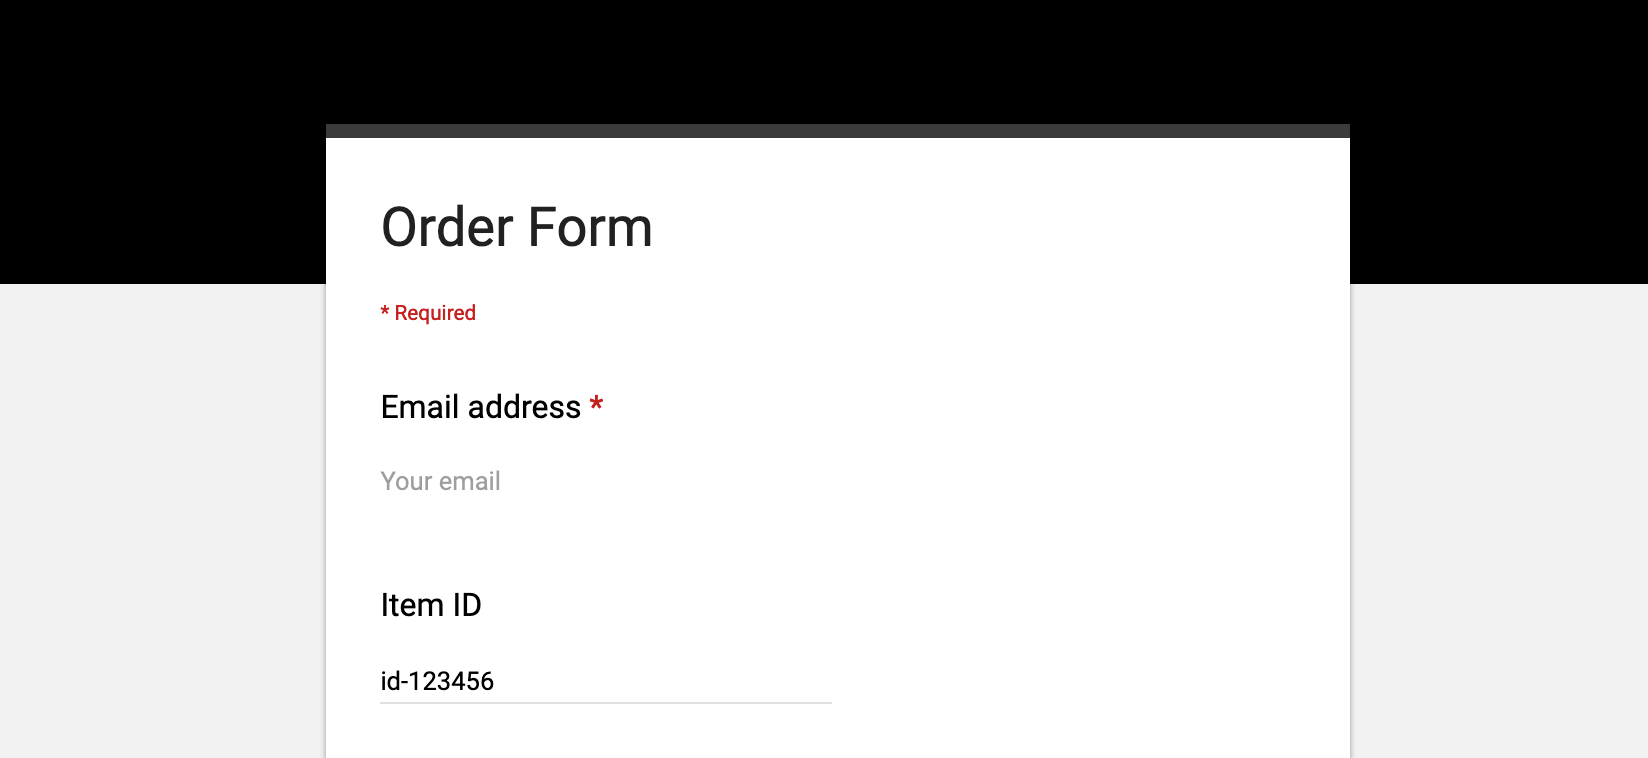
Tip 4: Pre-fill Google Forms with URL Parameters
The cool thing about Google Forms is that you can pre-fill your form with some specific value in the link. Let's say you list of items and the ordering form and when the user when click on the item he will open the form with prefilled item id
How to pre-fill Google Form link
-
Create a new form
forms.newor open an existing one - Click 3 dots in the top right corner
- Get pre-filled link
- Select field in your form that you want to pre-fill
- Press Get link
- Press Copy link in the bottom left corner pop-up
You should get a link like this:
https://docs.google.com/forms/d/e/1FAIpQLSeS97tfbZT1wrU0AM_gMBv_67_FkujKrQtSL-i5hlzwcE5X1g/viewform?usp=pp_url&entry.866939081;=id-123456
where
&entry.866939081;=
is your filed and
id-123456
is a pre-filled value.
Typeform
You can add a embeded Typeform that will pop-up when a user will click a link or a button
To add a typeform please add a typeform link like
https://andreyazimov.typeform.com/to/fM7ndm
in your Google Sheet navbar tab
Demo (click post a job in the top right corner)
Import Typeform to Google Sheet
Also you can automatically import result of your Typeform to Google Sheet
Open it from your Workspace, then click on Connect. Now you can see our integrations, so click on Connect in the Send responses to Google Sheets box.

Mailchimp

To integrate Mailchimp to your Sheet2Site website you need to get the Mailchimp subscribe url.
- Open your Mailchimp account
- Lists -> Select a list (or create a new list)
- Signup forms
-
Find copy/paste onto your site (code snippet). It should looks like this:

-
Find the url in
form actiontag -
Copy the link (without quotes). Looks like this:
https://whentosurf.us15.list-manage.com/subscribe/post?u=b9909498bfcf0094d3b867d70&id=58a5b633c3` - Paste it to your Google Sheet -> settings tab -> Call to action button Link:
Here is how you can prevent it from copying, download, or printing:
To be able to use Sheet2Site you need to make your Google Sheet public. This means that anyone on the internet with a link to your Google Sheet can see data, but can not edit it. If you have some sensitive information, please do not use Sheet2Site. The Google Sheet link may be found in the HTML source code of the Sheet2Site website and is not private.
But you can do certain things that could make harder to do it:
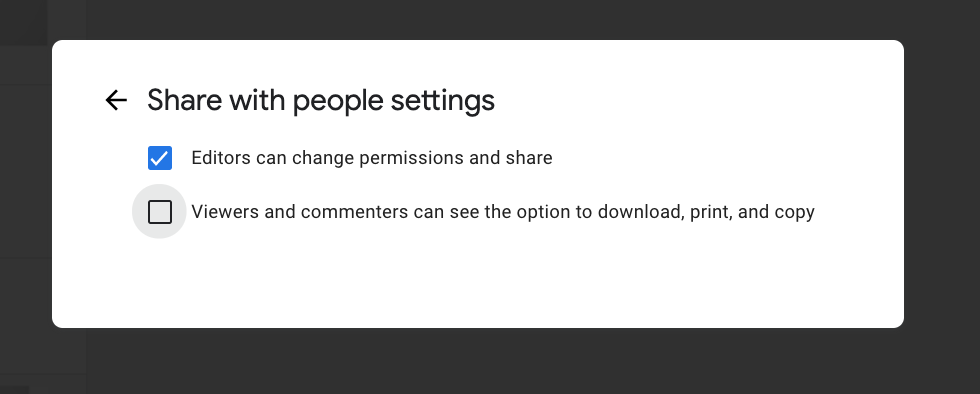
Prevent sheet from being copying and download
- Open your Google Sheet
- Click on a green Share button in the top left corner. Share with people and groups window should appear.
- Click on the Settings gear icon in the top left corner of the Share with people, and groups window.
- Disable checkbox: Viewers and commenters can see the option to download, print and copy
- Wait once your settings will be updated. You should see an notification
- Click Back
- Click Done
Hide the tabs in the Google sheet
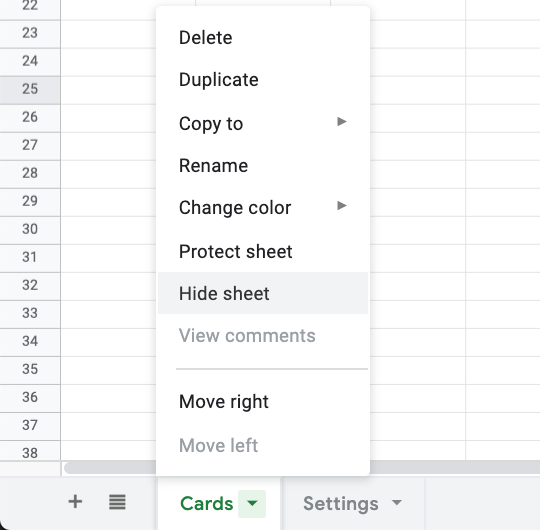
You can hide the tabs in your Google Sheet.
- Open your Google Sheet
- Choose the tab that you want to hide in the bottom of the page
- Right click: Hide sheet
Once you will do it people can't copy your Sheet, at least in an easy way.
Chat
- Register in Crisp Chat
- Create a website
- Open settings page
- Choose your website
- Setup instruction
-
Copy
Website ID - Open your Google Sheet. Main-tab page.
-
Paste to
Crisp Chat ID
You can use their iOS and Android mobile apps to stay in touch with your users
Customize Headers Titles for each page
Filter Pages - All filters buttons now has its own unique page:
SEO Page Example

How it looks in Google
Meta title and meta description is adding automatically to the website. Here how it looks in Google:

Beatiful Links
Each link looks beatiful with a slug e.g. example.com/category-san-francisco
Create SEO pages
Automatically generated Unique tag page e.g. example.com/category-san-francisco, /about, /contact-us
Customize Meta Tags e.g. 36 San Francisco Developer Jobs in August 2020
You can customize each page with a text patterns. It supports special variables like {keyword} and {count} that can makes your headlines much more SEO friendly.
Settings tab: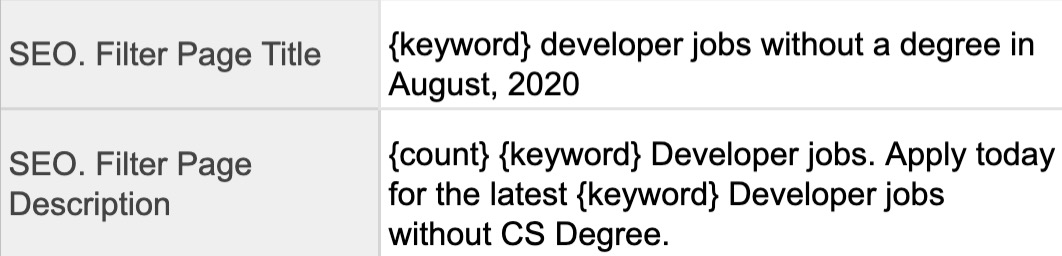
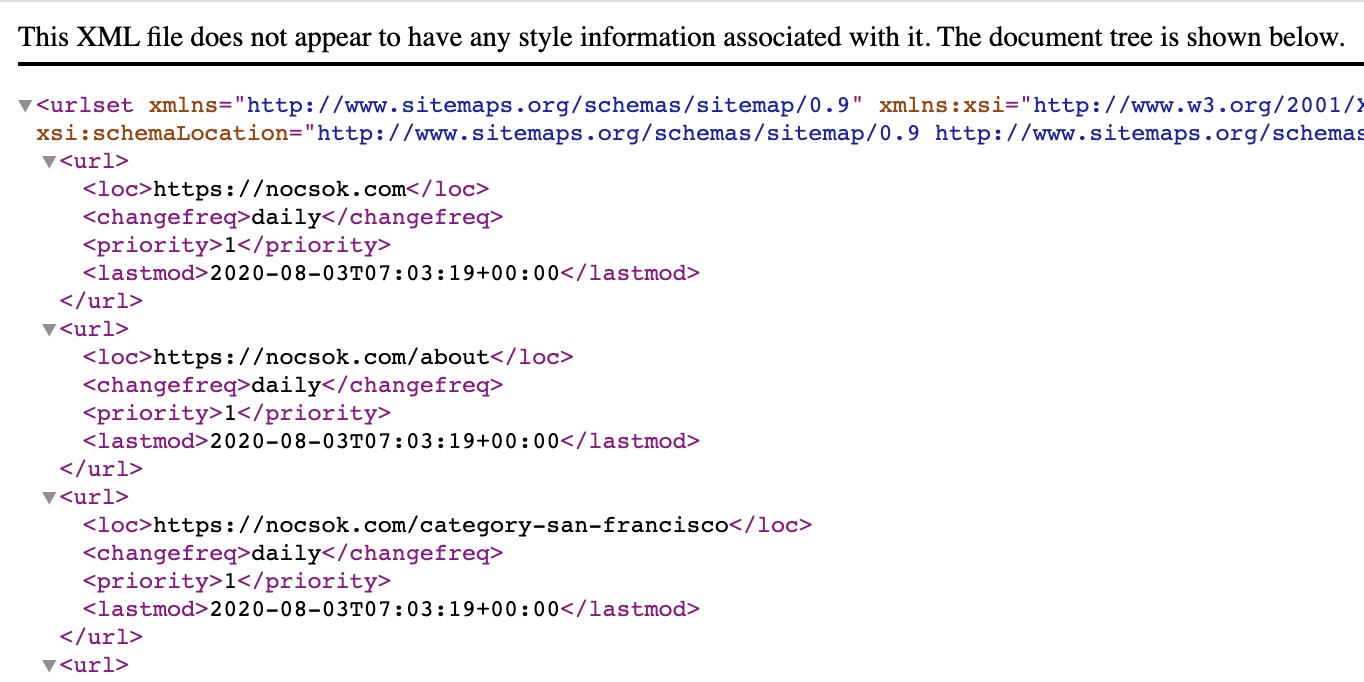
Sitemap XML
Sitemap XML that adding and updating all these links automatically
It is indexing in Google instantly.
All these category pages and all other detailed pages are adding and updating automatically to the website's sitemap:
Disqus
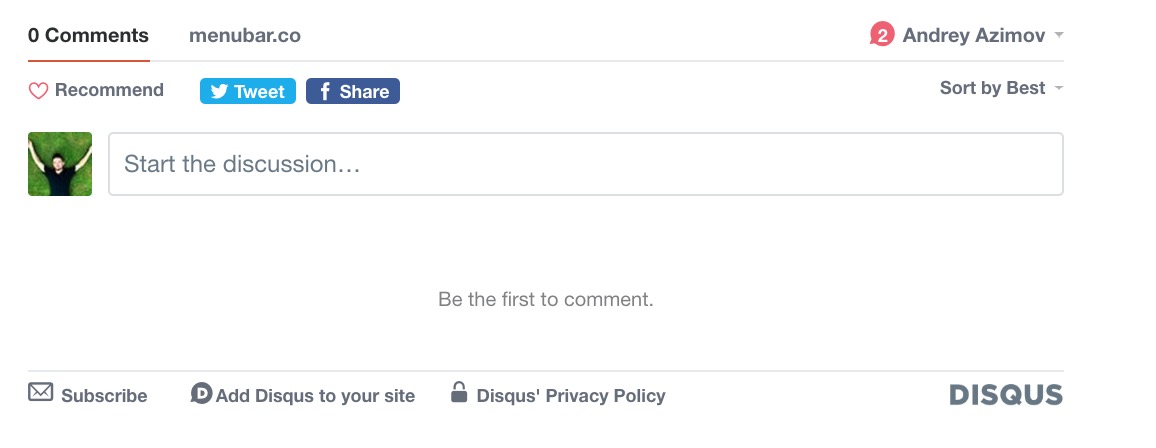
Now you can add a commets to each of your sub pages using Disqus The internet's favorite comment plug-in that makes it easy to make a comment section. So will be able to create a discussions, efficiently moderate comments, and build engaged community.
Let's say you are yu have a website with list of apps. Each app have its own sub page. And each sub page have a comment section in the bottom.
How to add Disqus to your website?
- Register in Disqus
- Add your website
- Get the code snippet. It should looks like this:
- We do not need this all code. We just need the source url. It's located in
s.src =.It should look liks thishttps://menubar-co.disqus.com/embed.js - Put this url in to
Settings tabtoDisqus URL
<div id="disqus_thread"></div>

<script>
var disqus_config = function () {
this.page.url = PAGE_URL;  // Replace PAGE_URL with your page's canonical URL variable
this.page.identifier = PAGE_IDENTIFIER; // Replace PAGE_IDENTIFIER with your page's unique identifier variable
};

(function() { // DON'T EDIT BELOW THIS LINE
var d = document, s = d.createElement('script');
s.src = 'https://menubar-co.disqus.com/embed.js';
s.setAttribute('data-timestamp', +new Date());
(d.head || d.body).appendChild(s);
})();
</script>

<noscript>Please enable JavaScript to view the <a href="https://disqus.com/?ref_noscript">comments powered by Disqus.</a></noscript>
Examples:
Google Analytics
To be able to aconnect Google Analytics to your website you need to setup a property and get a Get Tracking ID. Please check official documentation .
Tracking ID should looks like this:
UA-51392658-9
After you get it please open your Sheet, settings tab and paste your
Tracking ID
to
Google Analytics ID
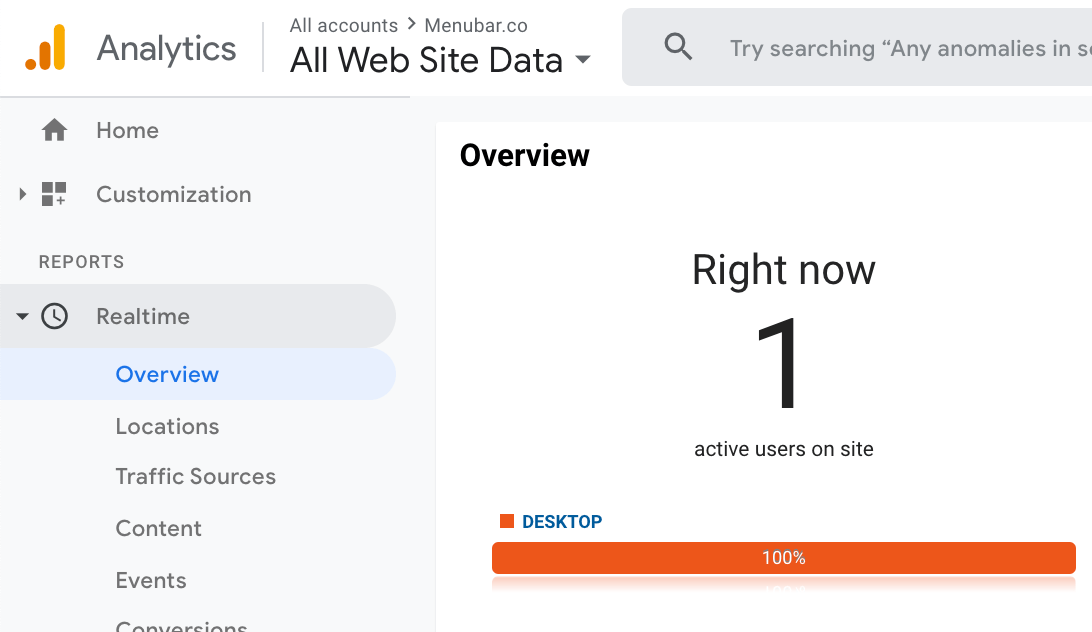
To check if it's working open "Realtime" -> "Overview" and visit your website. You should see at least 1 visitor:
Links tracking
Sheet2Site allows you to see the stat of most clicked links from your website via Google Analytics.
After you setup Google Analytics open your website and click on some of your links (maybe 10-20).
How to check outgoing links:
- Behavior
- Events
- Pages
- Change the date that incuded today in the date picker (top right corner) to make sure that data is included:
-
Select home page
/in the table - Outgoing Link:
- You should see all links that users clicked:
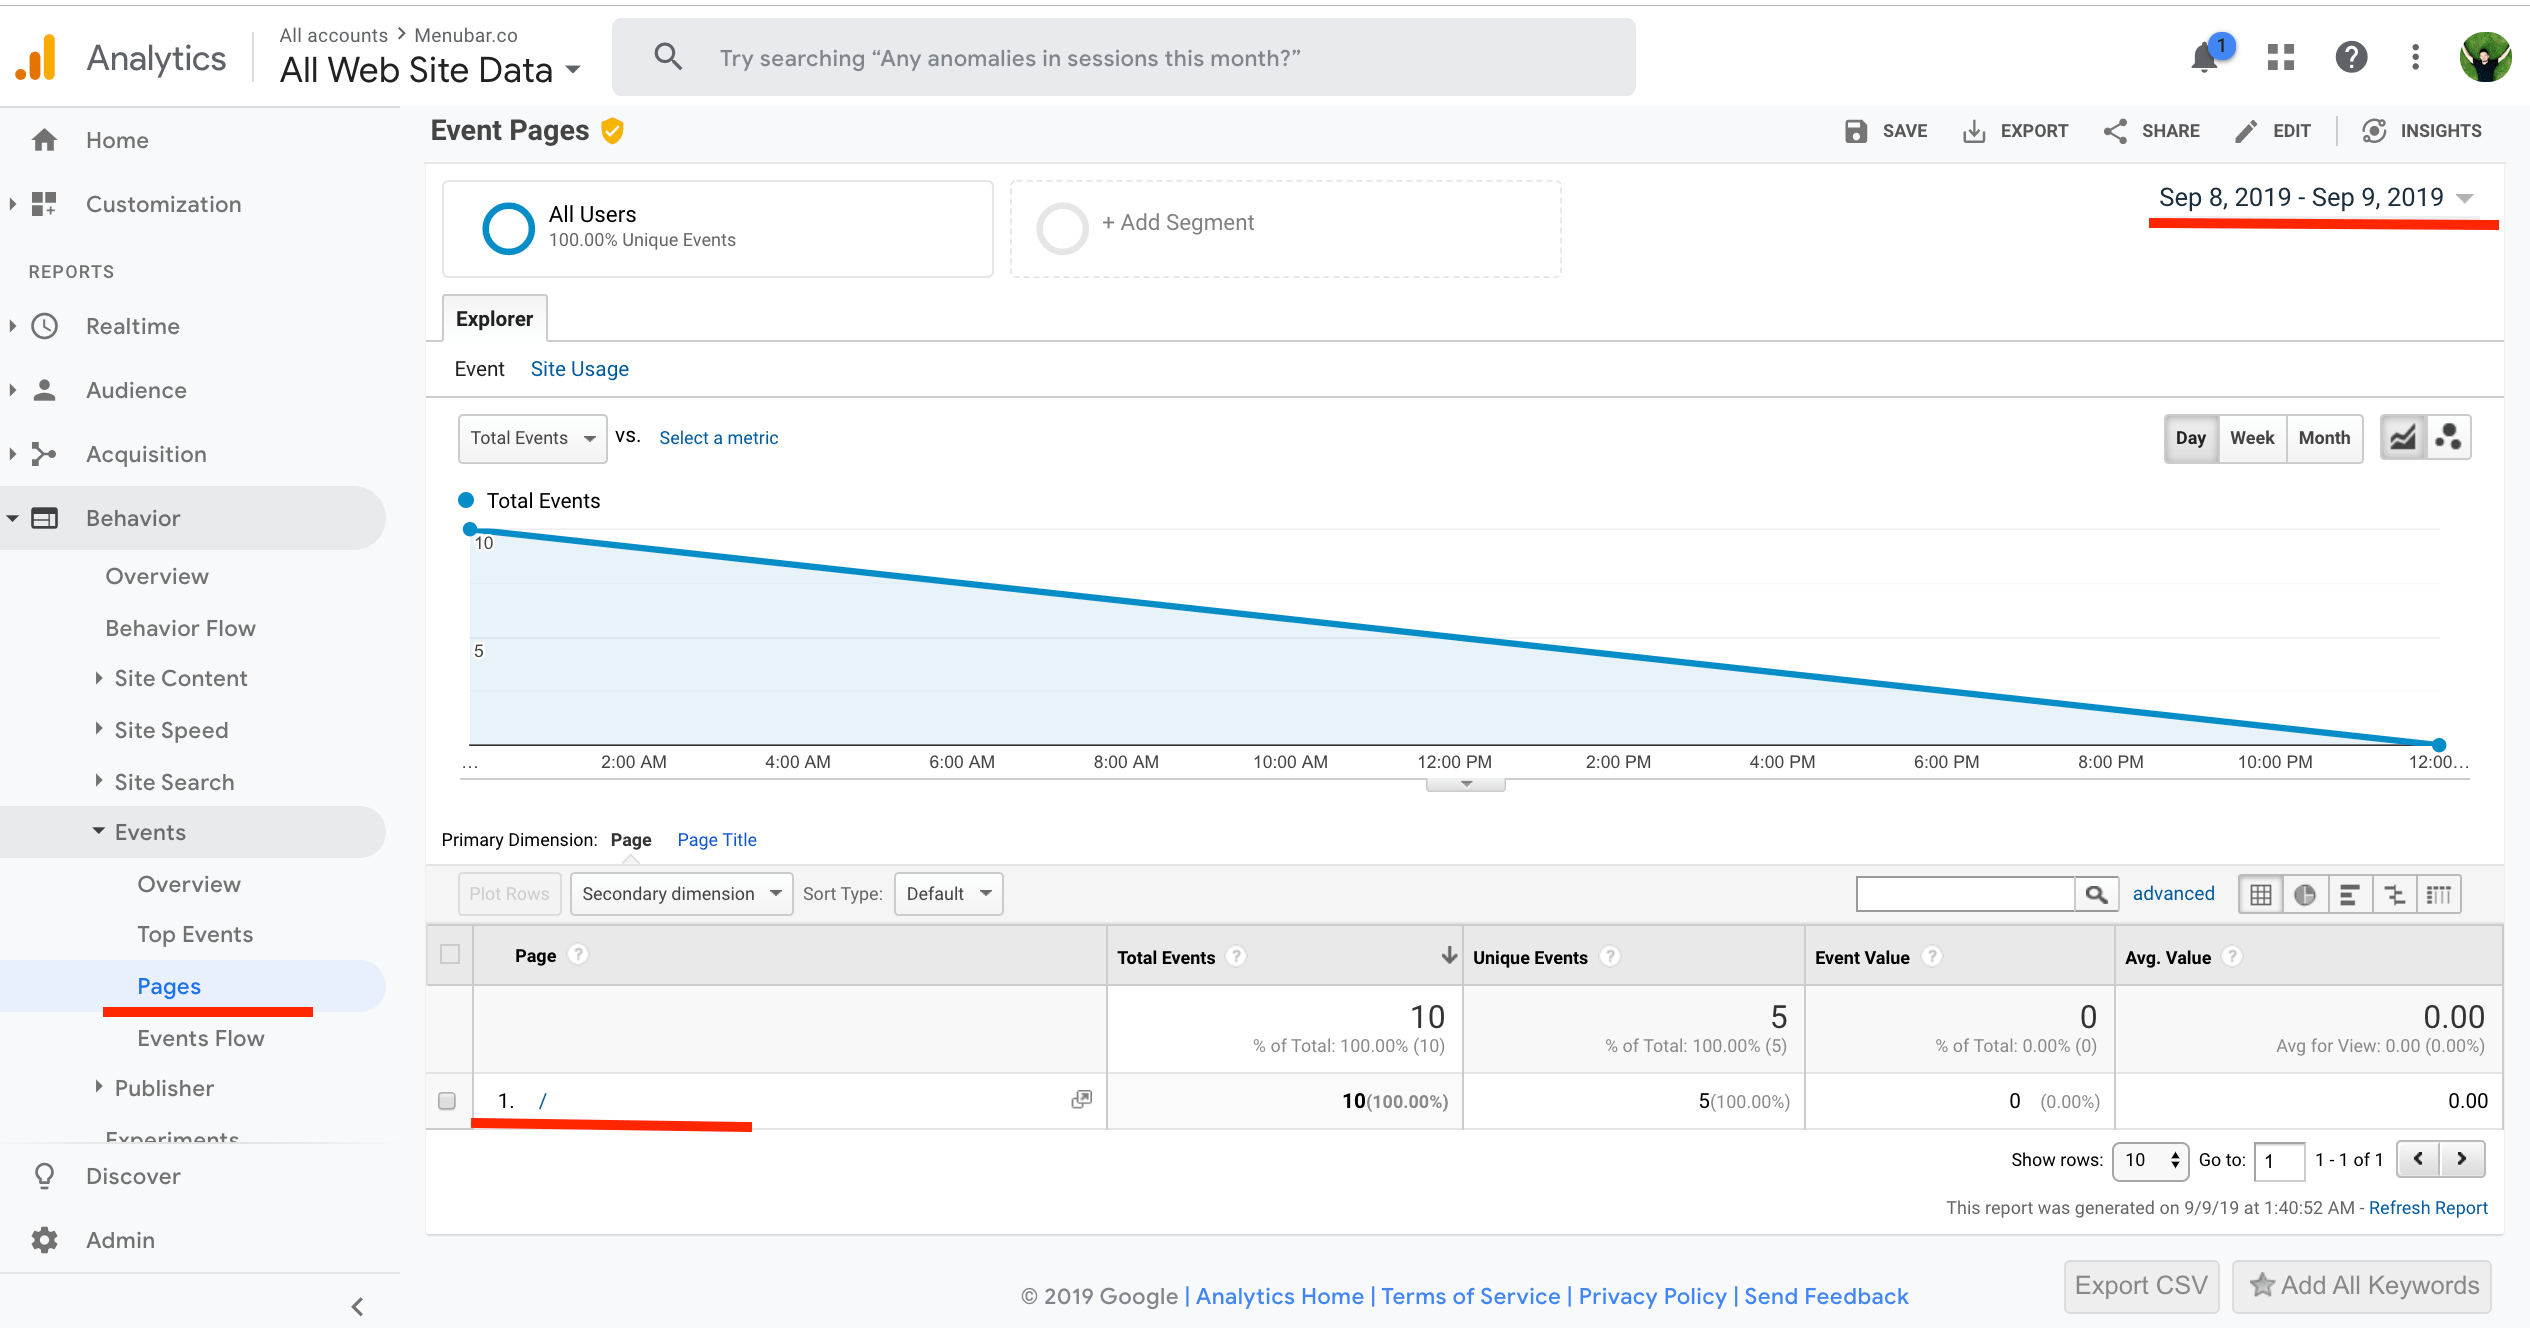
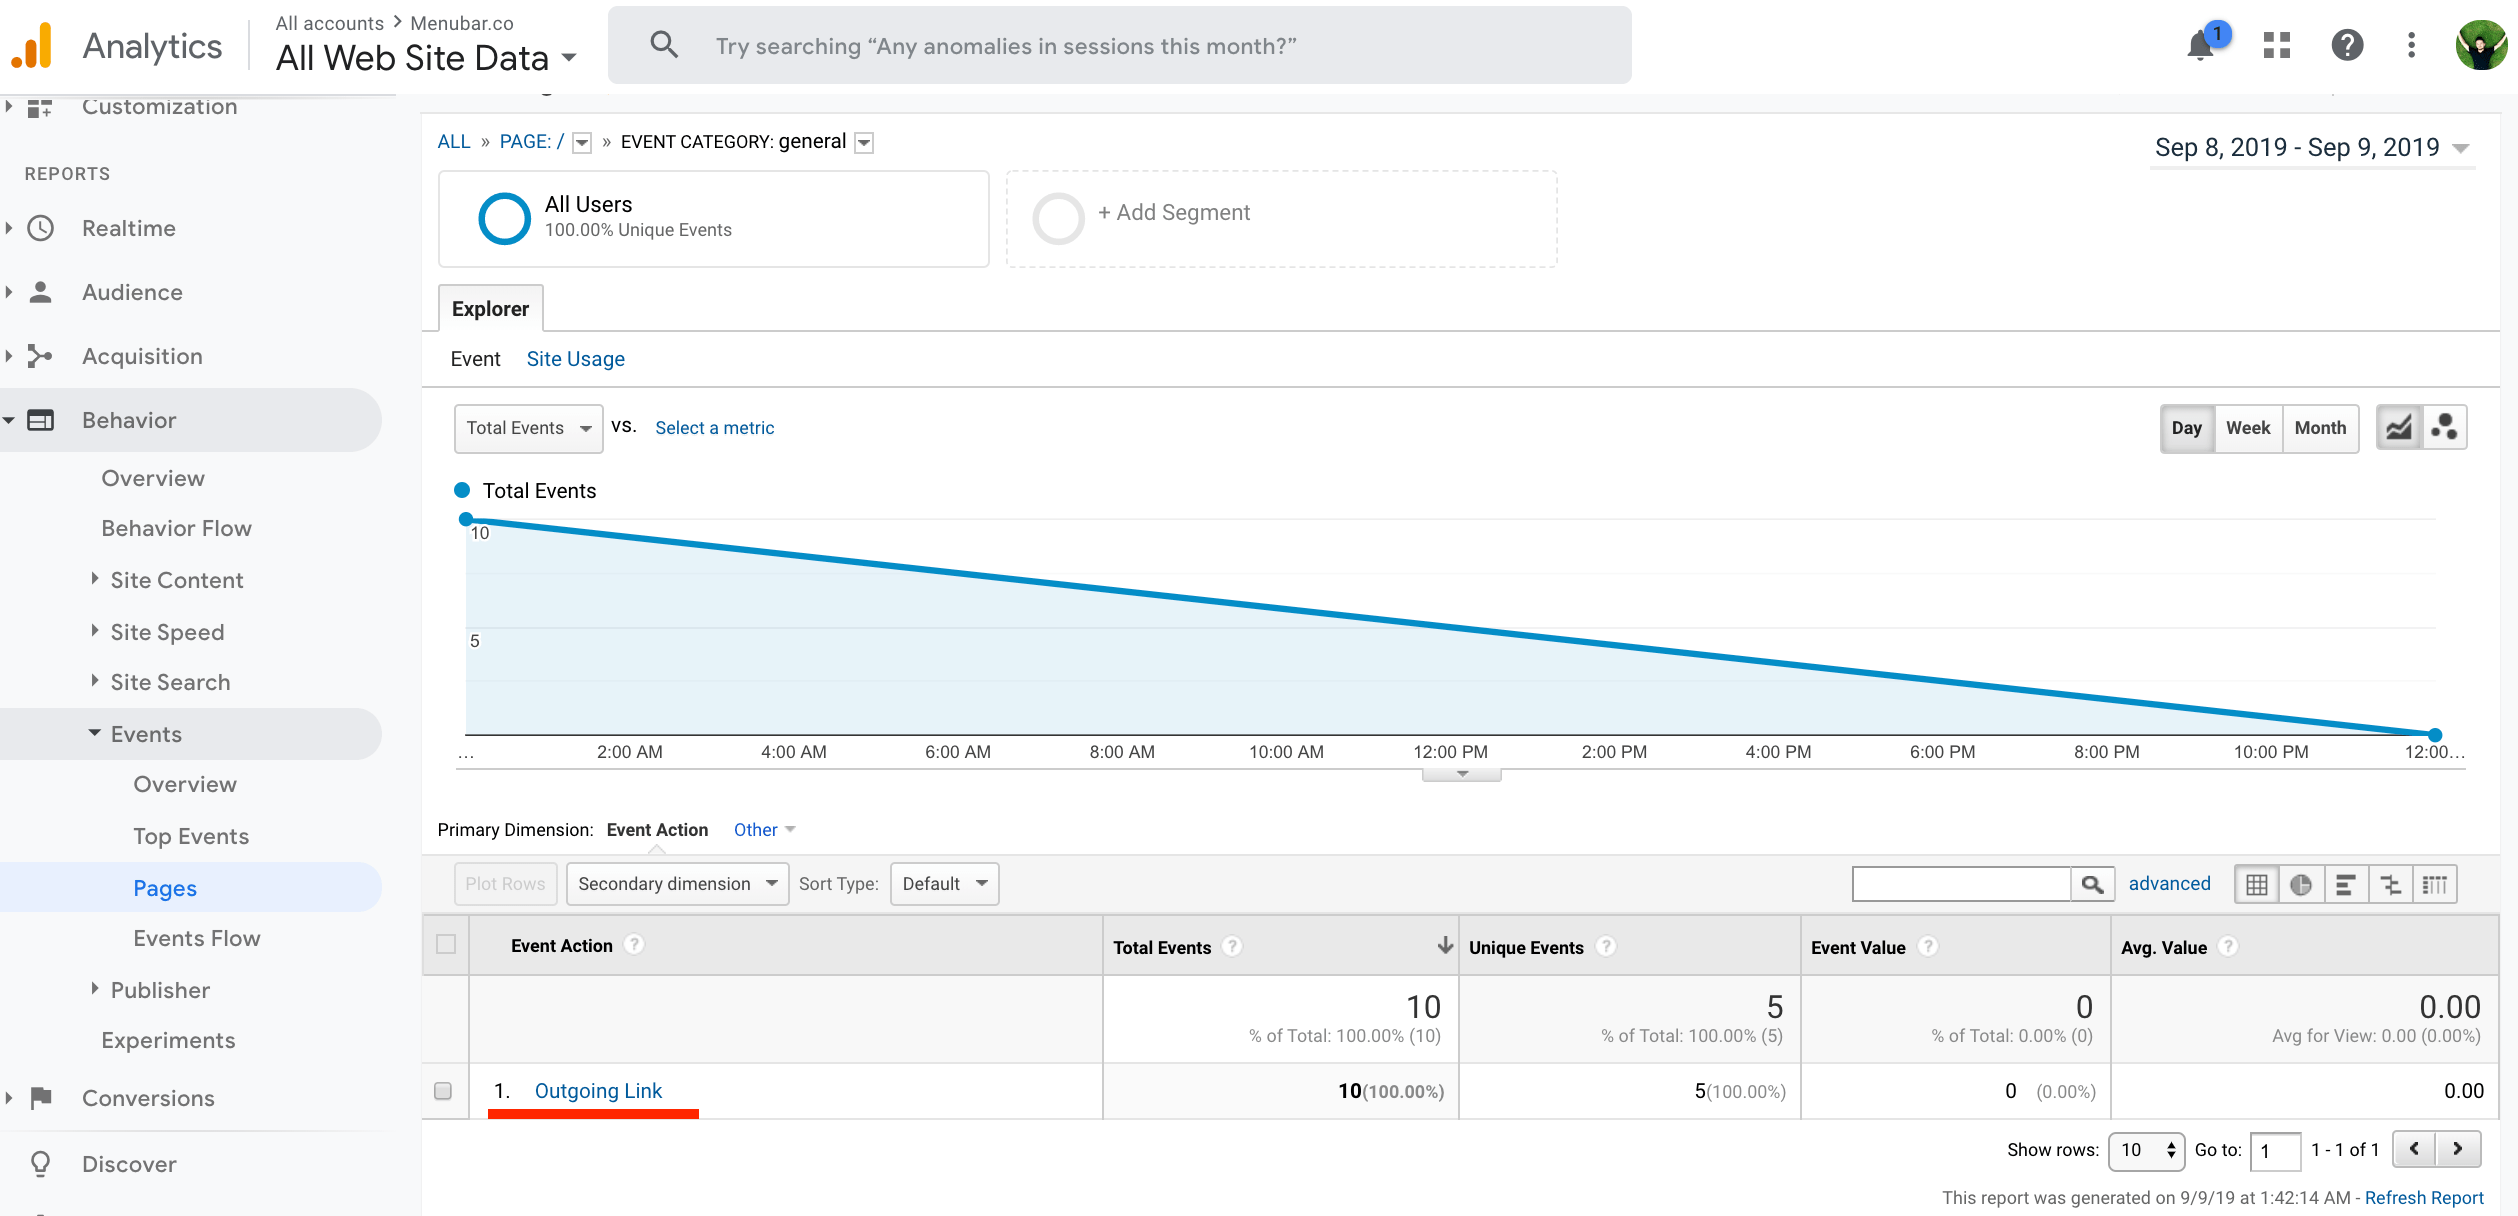
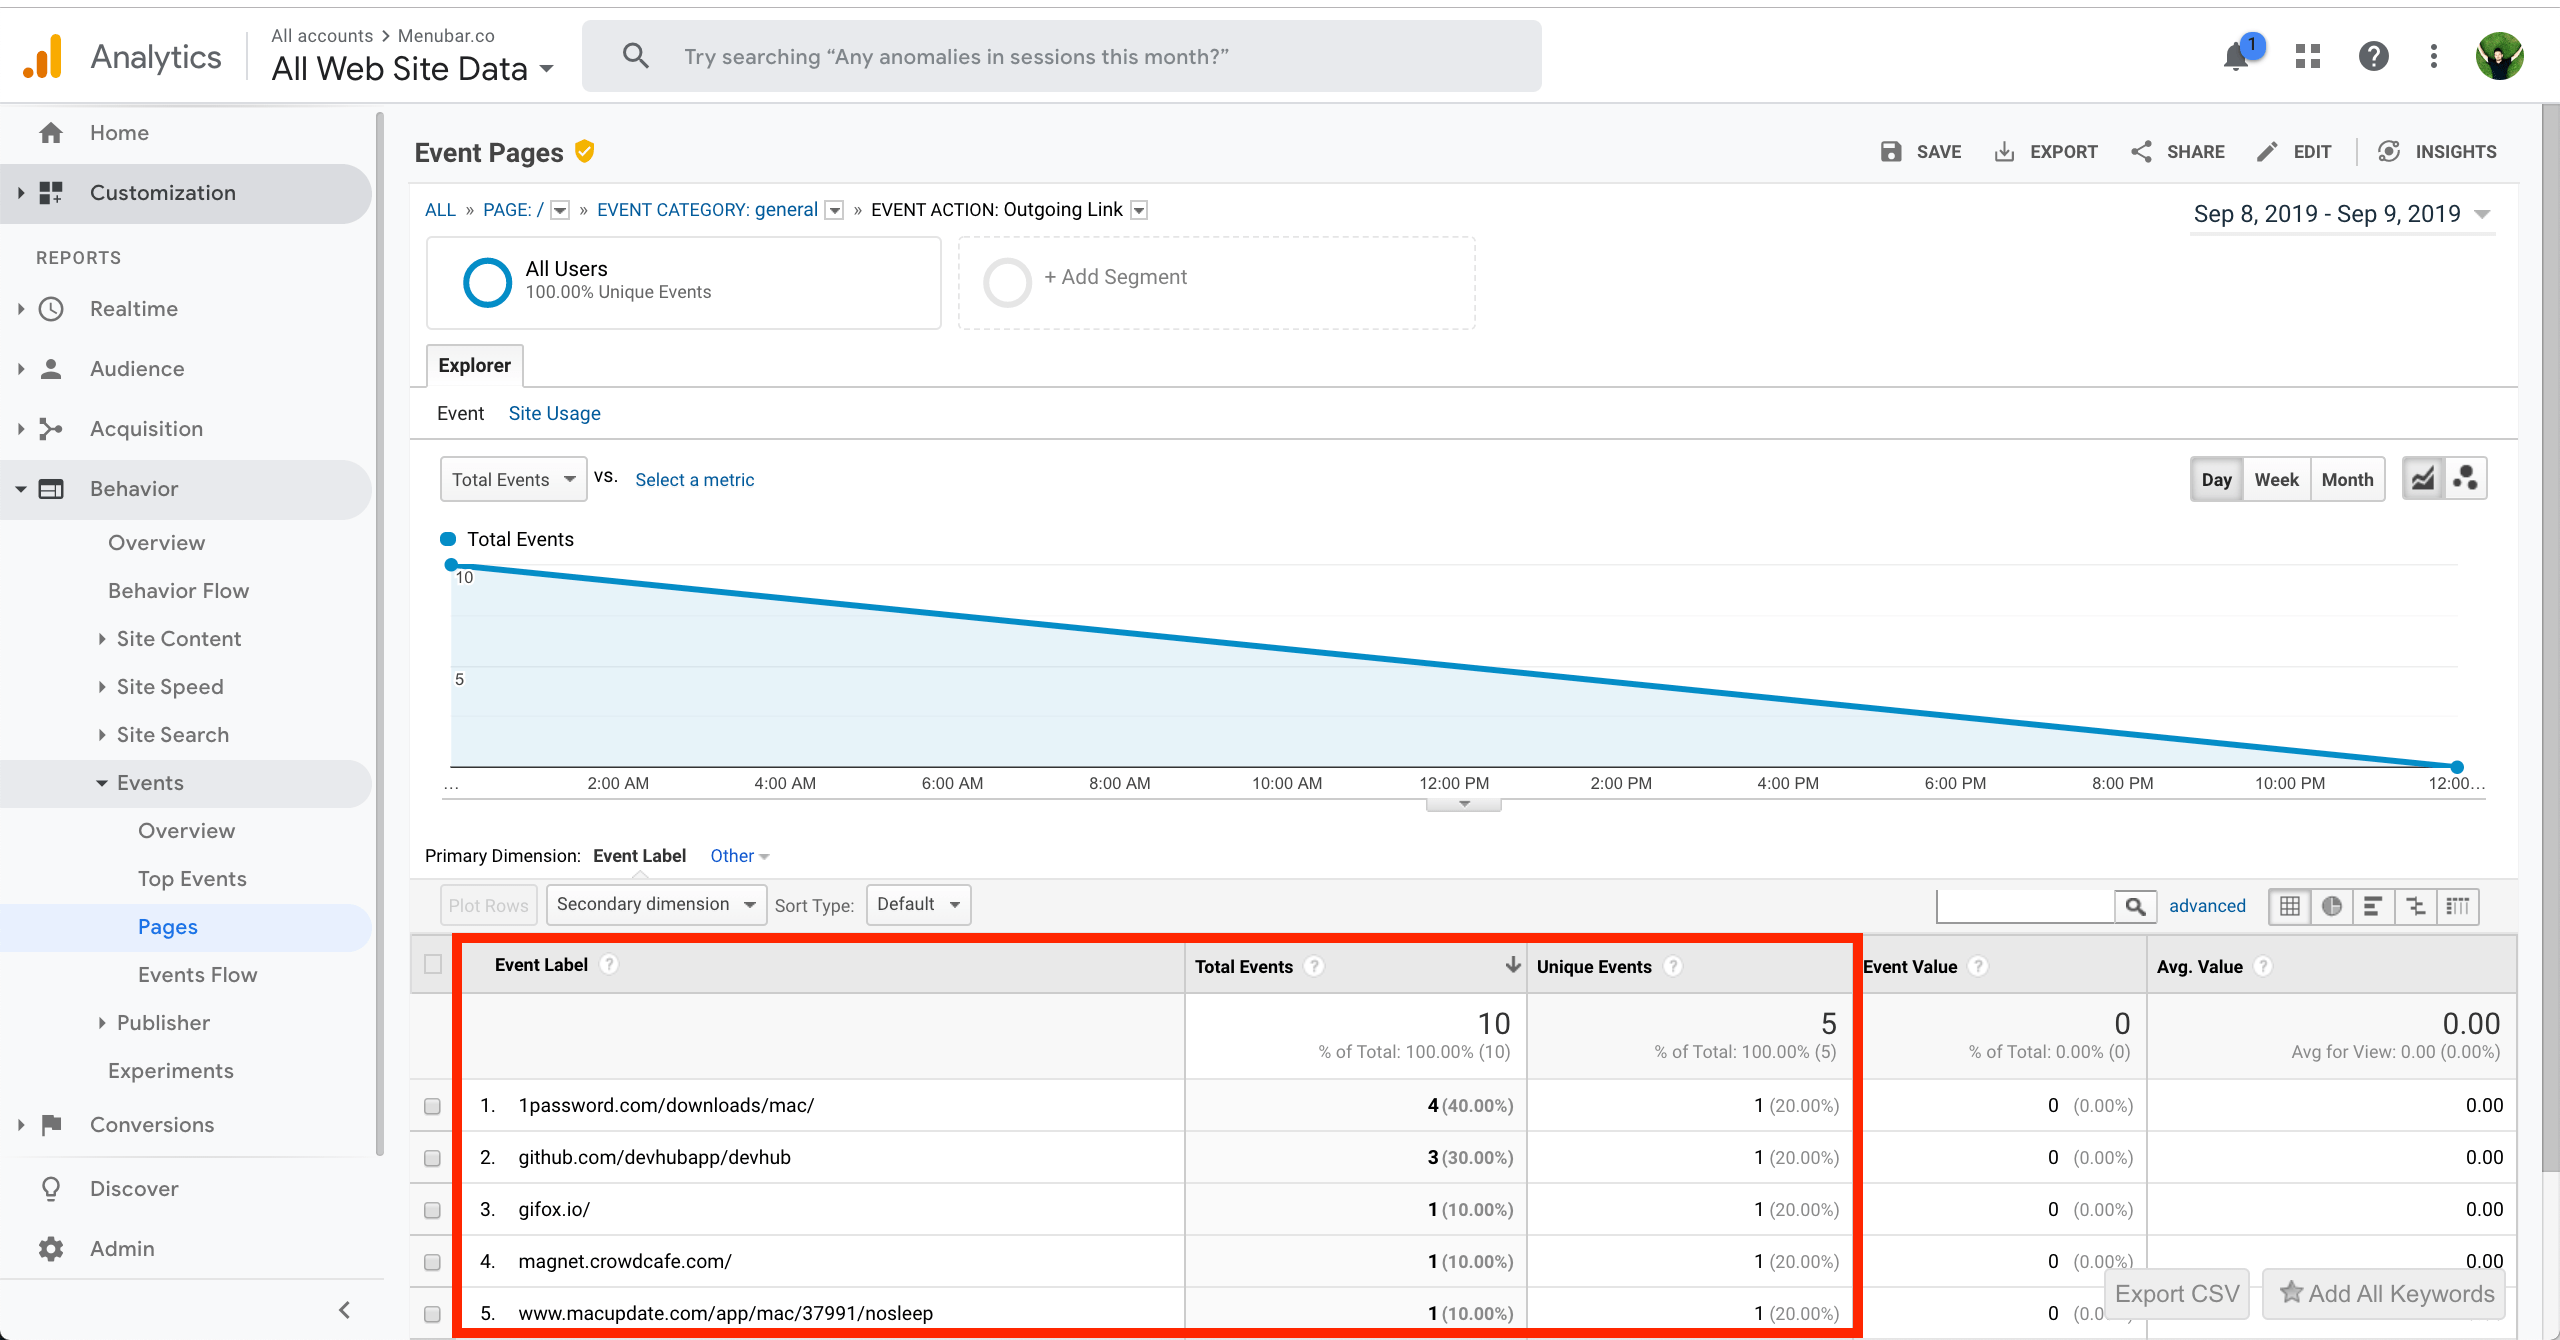
Data should updated in a couple of mins or less. You should see in your GA dashboard of links where clicks were performed.
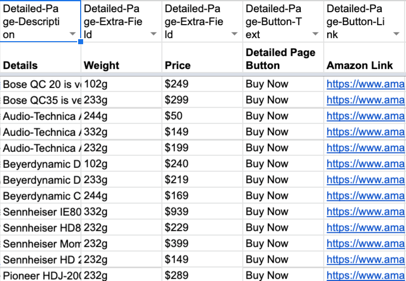
Amazon Affiliate

With Sheet2Site you can build Amazon Affiliate Websites. You can read more about Amazon Affiliate Program .
You can start with Business Template , but it's up to you what template will be better for you idea.
You need to find a niche of goods that you would like to sell. Let's say you want to sell books.
Example: thebooksbywomen.com
After you added all the books to content tab including: Name, Author, Image, Genre, Link
The link of a book should have your tag like:
https://www.amazon.com/Yes-Please-Amy-Poehler/dp/006226835X/?tag=kalinasapps02-20/?tag=kalinasapps02-20
And finally you need to add your Amazon Affiliate ID to the
settings
tab that looks like this:
3e0ebe95-36bb-4b10-9a0c-e9c442d4d19
Troubleshooting
Here are some tips how you can troubleshoot your website in different situations:
I accidentally messed-up my website
No problem. You can restore your website from the version history
Javascript
You can add Javascript scripts to your website. It could be pretty useful to extend standart functionallity. For example:
- Sharing buttons - to make visitors share your website in social media.
- Discourse - allows users write comments on your website
- Intercom - Live chat to talk to your users and send campaigns.
- Facebook Pixel - snippet of JavaScript code that allows you to track visitor activity on your website. Could be usefull if you are running facebook ads.
- Mailchimp pop-up window - if subscribe form in header is not enought you can add a pop-up that can be triggered when user spend on your website X seconds.
- and much more...
How to add Javascripts to your website
- Open your Google Sheet
- Advanced tab
- Javascript Script
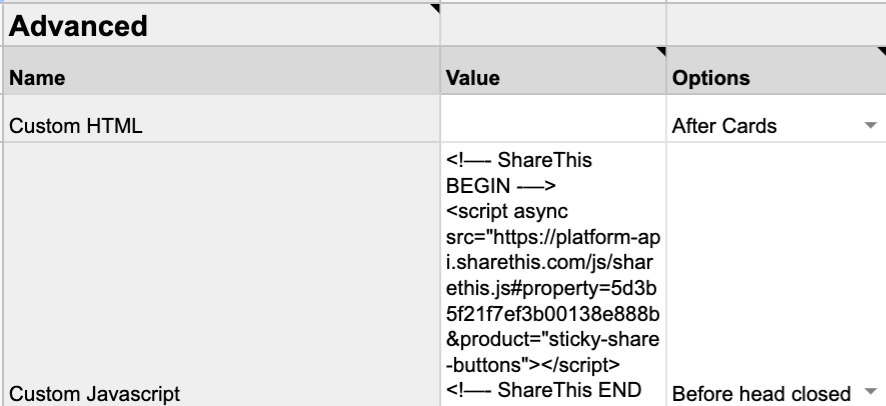
Your script should be wrapped in the script tag
    <script async src="">
    </script>
You have a possibility to choose where you want to add this script:
- Before head tag close
- Before body tag close
CSS Style
You can add custom css style. This mean that you can customize design of the website for your own neads. Just add style tag inside that custom script cell it will work.
For example you might want to center extra fields in the detailed pages
<style>
    .detailed-page-extra-fields-all {
        text-align: center
    }
</style>
How to add custom CSS style to your website
- Open your Google Sheet
- Advanced tab
- Custom Javascript (it's using the same cell for styles as for scripts.)
Custom Domain
1. Change DNS Settings
You can connect your Sheet2Site website in 3 different ways:
Here are some instructions how to change DNS settings:
1.1 - Connect as a root domain
Please one choose that you like more:
As naked domain:
To connect
example.com
please add this DNS record:
| Type | Host | Value | TTL |
|---|---|---|---|
| CNAME Record |
@
|
sheet2sitedns.com
|
Automatic |
Notes:
-
If you can't add
@value toCNAME Recordtry do this: -
Pease make sure that there is not existing
A Recordwith@
example.com
Cloudflare
to manage your DNS, please switch from
Proxied
to
DNS only
for all Sheet2Site CNAME records:

As www domain:
If you already added naked domain records records, please ignore this step.
To connect
www.example.com
please add this DNS record:
| Type | Host | Value | TTL |
|---|---|---|---|
| CNAME Record |
www
|
sheet2sitedns.com
|
Automatic |
1.2 Redirects
No matter what you will choose, the vistiros of your webiste will be redirect from
www
to
naked
and vise versa, so you will get all the visitors. Example:
-
Default is
example.com
If you open
www.example.com
redirected to
example.com
You need to add this DNS record:
| Type | Host | Value | TTL |
|---|---|---|---|
| CNAME Record |
www
|
@
|
Automatic |
Alterenativly if you can't add
@
you can setup a redirect you can setup it in your domain provider. Here are some instructions:
1.3 - Connect as a Subdomain
You can connect your subdomain domain
jobs.example.com
to your sheet2site website in 2 different ways:
Please one choose that you like more:
As naked subdomain:
To connect
jobs.example.com
please add these 2 records:
| Type | Host | Value | TTL |
|---|---|---|---|
| CNAME Record |
jobs
|
sheet2sitedns.com
|
Automatic |
| CNAME Record |
www.jobs
|
jobs
|
Automatic |
As www subdomain:
If you already added naked subdomain records records, please ignore this step.
To connect
www.jobs.example.com
please add these 2 records:
| Type | Host | Value | TTL |
|---|---|---|---|
| CNAME Record |
www.jobs
|
sheet2sitedns.com
|
Automatic |
| CNAME Record |
jobs
|
www.jobs
|
Automatic |
1.4 - Embed to your existing website
If you already have a website and want to embed your spreadsheet data in a visual way you can easily do it by adding a code snippet
Sheet2Site Embed support all major website builders such as Squrespace, Wix, WordPress, Weebly. It aslo support custom website build with code.
It will keep your logo, navigation bar footer. It will be on a separete page like: example.com/directory
You can embed your Sheet2Site page to your existing website with Sheet2Site Embed .
1.4 Check Your DNS
To check if you added DNS settings correctly please enter your domain (without http or https)
3. FAQ
3.1 How long does it take?
Connecting custom domain may take up to 24h but usually faster. Please be patient. I will message you after domain will be connected.
Please send me a screenshot once you are finished.
3.2 Do I need to buy custom domain?
Yes, you do. You can register domains on namecheap or on anyother domain provider.
.com
domains are generally cheap and cost like $11 / year.
3.2 I have already an existing website on my own domain
You can embed it to your existing websitesite with Sheet2Site Embed .
Alterenativly, you can connect your subdomain like
jobs.example.com
and you can still keep your current home page
example.com
that will work independently or you can embed sheet2site into your page using code snippet.
Stripe
How to connect Stripe to your Sheet2Site website
To be able to use Stripe you need to have a Stripe account and create a Google Form first, so you can get user's email and additional information that you need.
Just to let you know that the form response will be saved only if the payment will be successful, in other words if the users cancelled the payment, the data that he entered in the form will not be saved in the form as a response (and Google Sheet), but you will be able to see this data in your Stripe cancelled transactions as meta data.
Please follow these steps to connect Stripe to your website:
-
Create a Native Form
, connect it to your website and save the Google Form link.
Link should looks like this (for edit Google Form not for preview it):
                                https://docs.google.com/forms/d/1Hz4i_ie_0rxkIqPsRvOm4iDxprQdmvmcwlc193wXm-s/

                                    edit
Do not use these links:
-
Short links:
https://forms.gle/oyhMhCefmsZJGYNNGA -
Preview links:
                                    https://docs.google.com/forms/d/e/1FAIpQLSexQk1x0Tte2J_-mkEH-yqalmdLnMlAH68NogNLTGWx3gkHUQ/

                                        viewform
-
Short links:
- Create Stripe Publishable Key and Secret Key .
- Define price and currency, for example 99 USD.
Text Formatting
To make your content look better, you can format it with basic HTML Syntax. You can add titles, lists, images, links and more by inserting these HTML tags in your Google Sheet, which will be displayed on your website.
For example let's say that you want to format your vacancy description:

You can add this code snippen to your decription:
<div>
    <h3>We would like to hear from you if you have...</h3>
    <ul>
        <li>A deep understanding of Agile frameworks and Lean principles, at the level of the principles and values,
            to enable appropriate application as well as innovation</li>
        <li>A strong ability to understand complex systems, relentlessly managing the technical and business risk
            landscape, anticipating and mitigating emerging issues </li>
        <li>Experience facilitating and leading continual planning processes in a complex and exciting environment
        </li>
        <li>Proven experience on achieving goals and hitting deadlines, based on company-wide objectives, regardless
            of the obstacles</li>
        <li>An ability to facilitate, catalyse and lead organisational change and transformation, drawing on change
            management, organisation culture, organisation development and systems thinking</li>
        <li>A high level of emotional intelligence, excellent communication skills, ability to listen with empathy
            and enable people to act by increasing insight</li>
        <li>You’re excited to be part of the vibrant Delivery Community at Improbable, challenging and improving
            processes to increase the effectiveness of a team or division.</li>
    </ul>
</div>
Import JSON
A lot of good structured data is available through APIs like weather, ratings, currency rates and many more. APIs give you this data in JSON format and now it's possible to import JSON data directly into Google Sheet.
To be able to do it you need a custom function that called
ImportJSON
- Open your Google Sheet -> Tools -> Script Editor
-
Rename it to
ImportJson.gs - Delete the placeholder content
- Copy this script
-
Paste to your script and save it (click save icon)
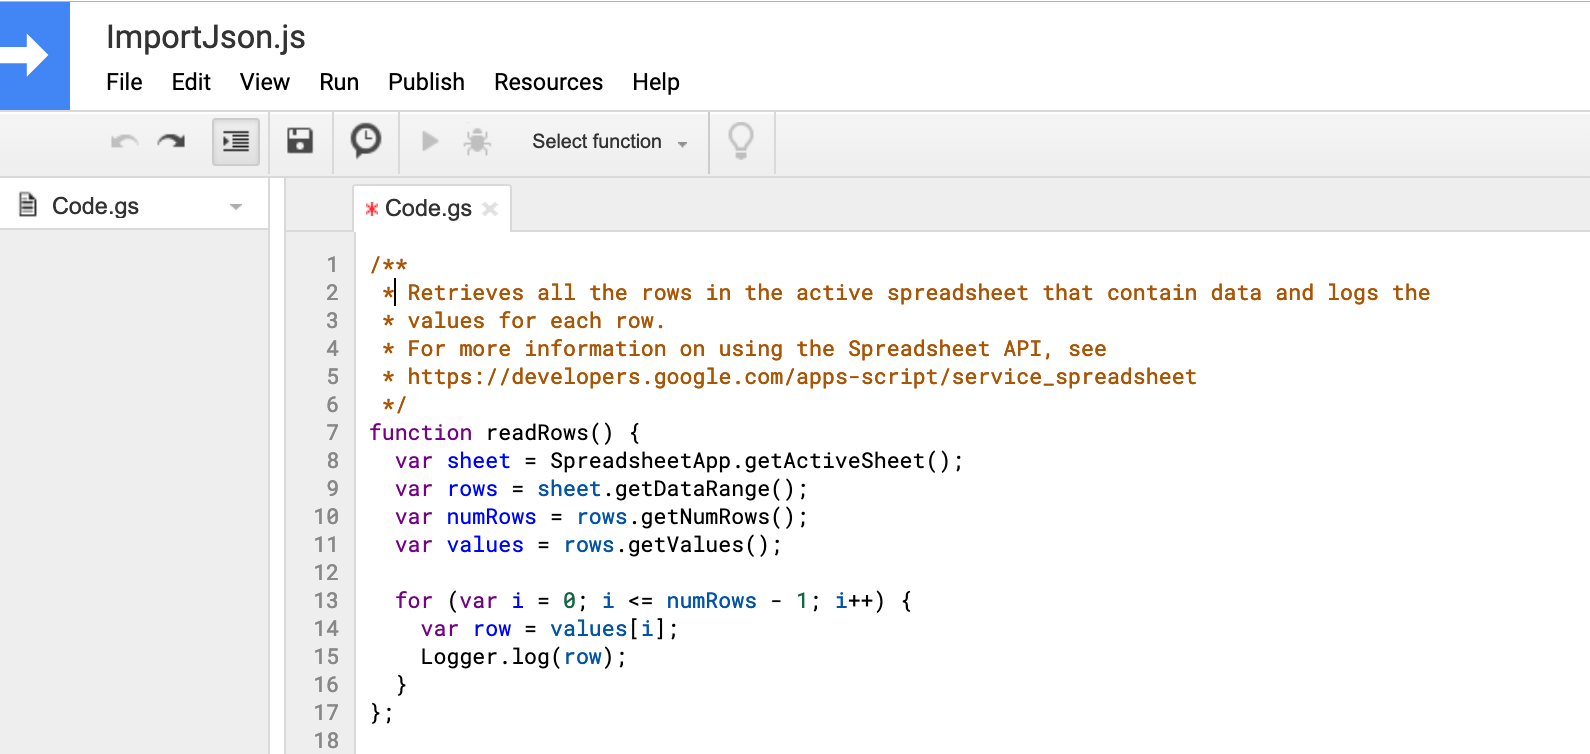
-
Go back to your sheet and try to call the function from your cell:
=ImportJSON("http://date.jsontest.com", "/date", "noInherit, noTruncate")
You should see something like this:

More information how to use it here . Thanks to @bradjasper who created it.
Payments
The best way to know if people like your product is they're actually pay for it. Here are some ways how you can charge your clinets. You can add them as call to action button link.
PayPal

PayPal button
is probably the easiest way to get money. You can create a simple link with your name and the amount of money. Example:
https://www.paypal.me/andreyazimovpay/9.99usd
.
To create such a link open PayPal.me and follow the instructions
Gumroad

Gumroad
is great payment systems for creators. You can charge your clients for single time payment products or with reccurent payments. Each product will have a special like like
https://gumroad.com/l/awesomejobboard
With Gumroad you can withdraw money to PayPal.
To start using Gumroad please register there and add a product and a price.
Please read their official documentation about getting paid and other details.